# Export Slicers as Image
## Content
SpreadJS supports exporting slicers as image sources. After adding a slicer, you can get the image source using the `slicer.toImageSrc()` API.
> **Note**: Only [Table slicers](/spreadjs/docs/v17/features/tablegen/slicer) and [PivotTable slicers](/spreadjs/docs/v17/features/pivot-table/pt-slicer) can be exported to image using the `toImageSrc()` method.
### Using Code
The following code sample depicts how to save the table slicer on spreadsheet as an image source.
```javascript
// Create a table.
datas = [
["1", "NewYork", "1968/6/8", "80", "180"],
["4", "NewYork", "1972/7/3", "72", "168"],
["4", "NewYork", "1964/3/2", "71", "179"],
["5", "Washington", "1972/8/8", "80", "171"],
["6", "Washington", "1986/2/2", "89", "161"],
["7", "Washington", "2012/2/15", "71", "240"]
];
var table = sheet.tables.addFromDataSource("table1", 2, 2, datas);
dataColumns = ["Name", "City", "Birthday", "Weight", "Height"];
table.setColumnName(0, dataColumns[0]);
table.setColumnName(1, dataColumns[1]);
table.setColumnName(2, dataColumns[2]);
table.setColumnName(3, dataColumns[3]);
table.setColumnName(4, dataColumns[4]);
// Add a slicer to the sheet and return the slicer instance.
var slicer = sheet.slicers.add("slicer1", table.name(), "Name");
// Change the slicer properties.
slicer.width(200);
slicer.height(200);
slicer.position(new GC.Spread.Sheets.Point(100, 200));
slicer.style(GC.Spread.Sheets.Slicers.SlicerStyles.dark4());
// Get the slicer as an image source.
let slicerImageSrc = sheet.slicers.all()[0].toImageSrc();
```
### Using Designer
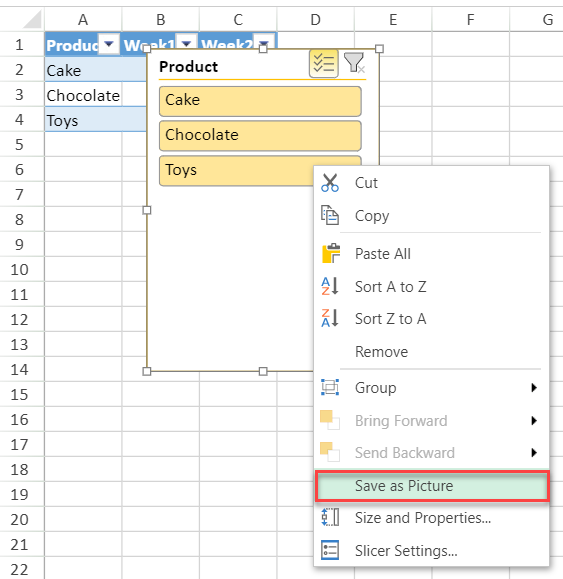
When you select a slicer in Spread Designer, you can also save it as an image by clicking the **Save as Picture** option.
Following are the steps to save a slicer as an image:
1. Open a worksheet.
2. Insert data.
3. Insert slicer.
4. Right-click on the slicer and then click **Save as Picture**.
5. Select the location where you would like to save the image.
6. Name the file and click **Save**.
> **Note**:
>
> * Slicers retain both the currently selected and mouse-over states during the export process to an image.
> * Currently, the exported file format is PNG and the file name is the slicer name.
> * If multiple slicer objects are selected, they will be exported together and all of them will be exported as a file named **SpreadShapes** by default.