# Manage Document Properties
## Content
Document properties contain information about a workbook, such as title, author, subject, etc. SpreadJS allows you to manage these properties within the workbook.
To manage document properties, SpreadJS provides `docProps` property of type [IDocProps](/spreadjs/api/v17/interfaces/GC.Spread.Sheets.IDocProps) interface. It allows customization of document properties, such as `coreDocProps`, `appDocProps`, and `customDocProps`.
* **Core Document Properties** \- These are fundamental properties like title\, creator\, and keywords that provide essential information about the document\.
* **App Document Properties** \- These properties are specific to managing the document\, such as manager\, company details\, etc\.
* **Custom Document Properties** \- These are user\-defined properties that can be saved in various data types\.
### Using Code
The following code sample depicts how to set document properties.
```javascript
// Set core document properties.
spread.docProps.coreDocProps = {
title: 'Sample Document',
creator: 'Admin',
keywords: 'sample, document',
subject: 'Sample Subject',
description: 'This is a sample document',
category: 'Sample Category',
contentStatus: 'Draft',
created: '11/01/24',
lastPrinted: '20/01/24',
modified: '21/01/24',
lastModifiedBy: 'John'
};
// Set app document properties.
spread.docProps.appDocProps = {
manager: 'John',
company: 'XYZCompany',
hyperlinkBase: 'https://example.com/documents/'
};
// Set custom document properties.
spread.docProps.customDocPropsManager.all([
{ name: 'Kim', value: '1' },
{ name: 'Smith', value: '2' }
]);
// Get document properties.
console.log(spread.docProps.coreDocProps);
console.log(spread.docProps.appDocProps);
console.log(spread.docProps.customDocPropsManager.all());
```
You can also change the custom properties of a document by using the `customDocPropsManager` property of the `IDocProps` interface. The following code sample demonstrates how to use a custom property manager to add, remove, get, list all, and clear custom properties associated with a document.
```javascript
const customPropsManager = spread.docProps.customDocPropsManager;
customPropsManager.all([
{ name: 'name1', value: 'value1' },
{ name: 'name2', value: 'value2' },
]);
// Set new custom document properties.
customPropsManager.add('name3', 'value3');
customPropsManager.add('name1', 'value1_modified');
// Remove the custom document property 'name2'.
customPropsManager.remove('name2');
// Get the value of the custom document property 'name3'.
customPropsManager.get('name3'); // Output: 'value3'
// Get all remaining custom document properties.
customPropsManager.all(); // Output: [ { name: 'name1', value: 'value1_modified' }, { name: 'name3', value: 'value3' } ]
// Clear all custom document properties.
customPropsManager.clear();
```
### Using Designer
To manage document properties within your workbook, follow the below steps.
#### **View or Modify Standard Properties**
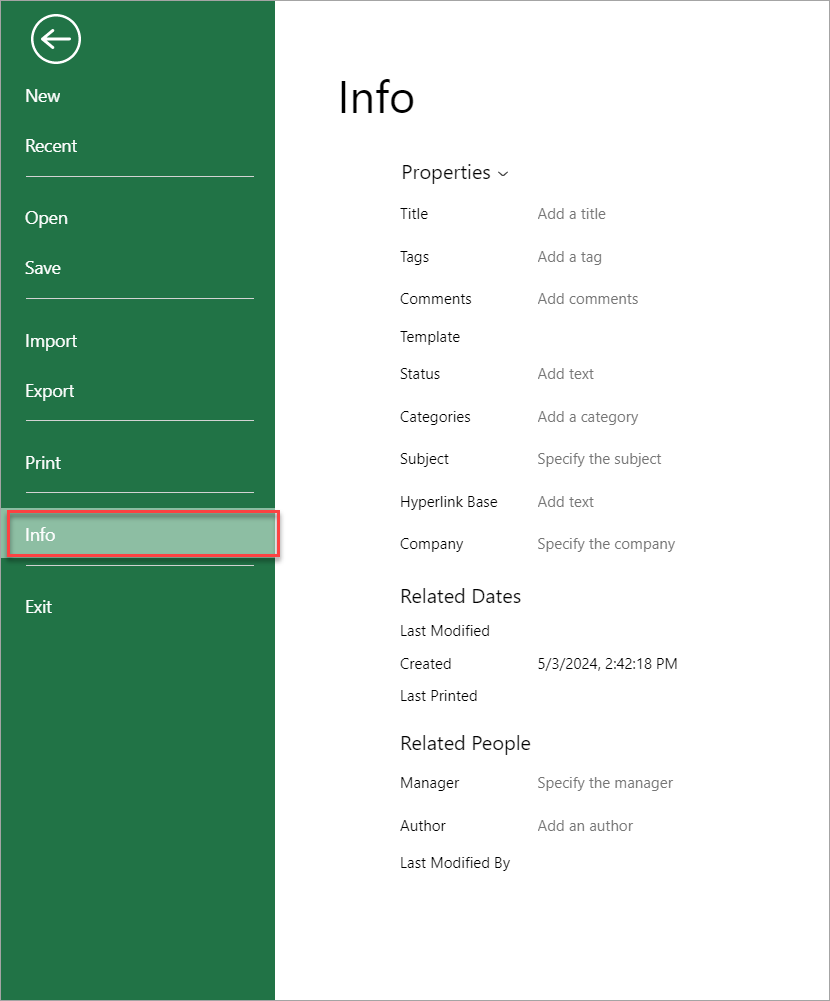
1. Click on the **File** tab and select **Info**.
2. The right side of the **Info** tab displays the workbook’s properties.
3. Add or modify the necessary information.
4. Click outside the text field to save the changes.
#### **Edit Advanced Properties**
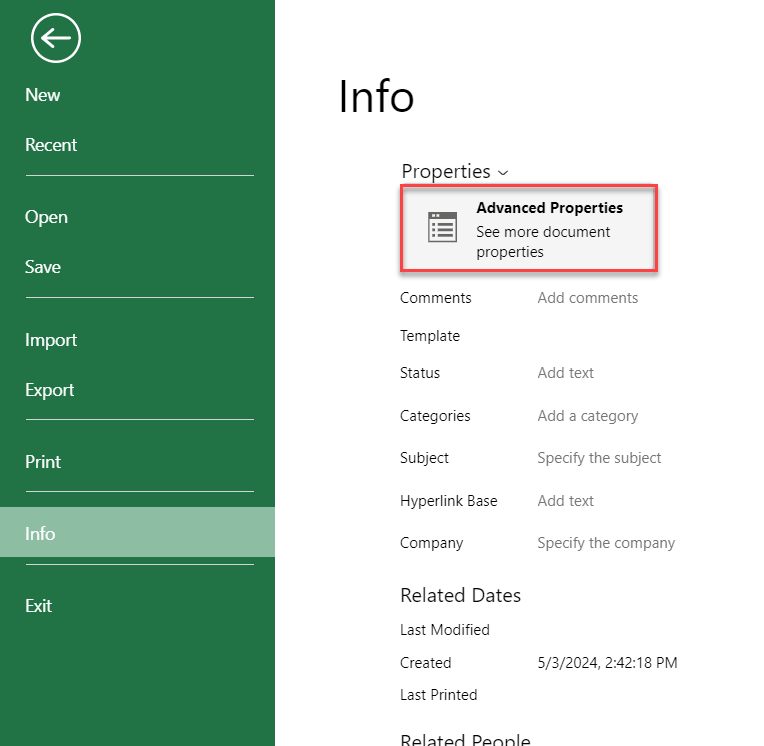
1. Click on the **File** tab and select **Info**.
2. Click the **Properties** dropdown and select **Advanced Properties**.
3. In the **Properties** dialog, there are different tabs, like Summary, Statistics, Contents, and Custom.
Each tab helps configure different kinds of information related to the document.
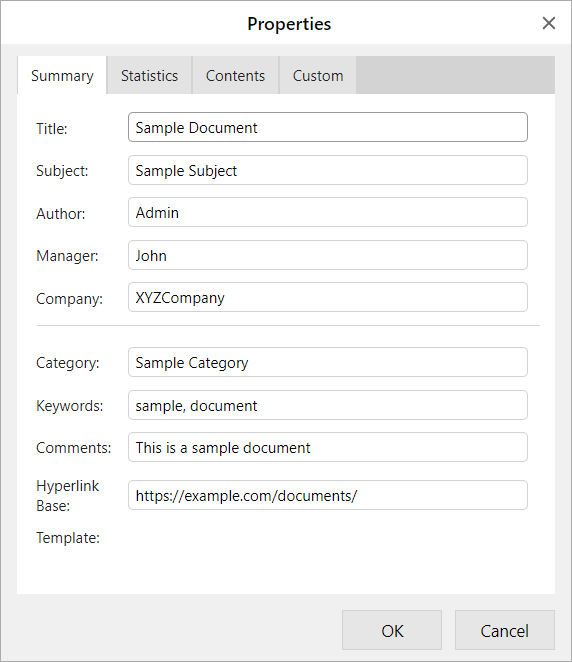
By default, the **Summary** tab is selected. You can add/change the document summary information, as per your requirement. You can also view general information about your document in the **Statistics** and **Contents** tab.
4. Click the **Custom** tab to define additional custom properties.
1. In the **Name** field, type a name for the custom property or select from the list.
2. In the **Type** dropdown, select the data type.
The available data types are as follows:
1. Text
2. Date
3. Number
4. Yes or No
3. In the **Value** field, enter the value matching the selected data type.
The value that you provide must match the selection in the Type list. For example, if you choose ‘Number’ in the **Type** list, you must enter a number in the **Value** box. Note that the values that do not match the property type are saved as *Text*.
4. Click **Add**.
After adding a custom property, it appears in the **Properties** list.
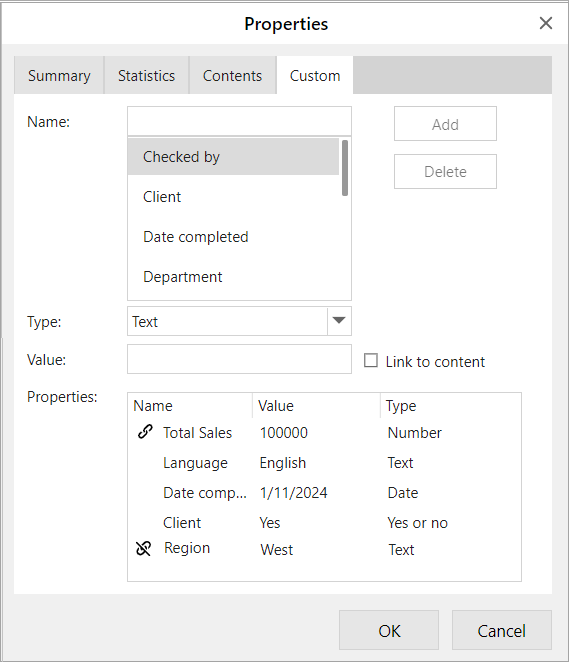
Additionally, SpreadJS provides a **Link to Content** setting to link document content to a property value so that whenever the content value changes, the document property will automatically update to reflect the new value. Here's an example that illustrates how this setting works.
**Example**: Assume you have a workbook with a sales data sheet containing several tables and charts.
1. Create a document property called "Total Sales" that automatically updates whenever the total sales value in cell B10 of your Sheet1 changes.
2. In this instance, first [create a custom name](/spreadjs/docs/v17/spreadjs_designer_component/spdesignerwork/name-box) for the cell like Sheet1!$B$10.
The custom name(s) will also be visible in the **Contents** tab and under the **Named Ranges** section.
3. Now, navigate to the **Custom** tab and type "Total Sales" in the **Name** field, and select the **Link to content** checkbox.
The **Value** field displays the custom name you created.
4. Click **Add** and the property will appear in the **Properties** list along with a linked icon and contain the same value as for cell i.e. Sheet1!$B$10.
Whenever the value in cell B10 changes, the "Total Sales" document property will automatically update to reflect the new value.
However, if a custom content link property is invalid, an unlinked icon will appear before the property name, and it can only be deleted.
5. Click **OK** to save the properties to the workbook.
> **Note**:
>
> * When importing/exporting an Excel file using SpreadJS, the docProps properties should always be maintained.
> * If an imported document has a created time, it will use the existing created time of the document. Otherwise, there is no created time.
> * When opening a new Designer, the creation time is set to the current time by default. After clicking to add a new workbook, it will be updated to the most recent time.
> * When importing, SpreadJS uses the modified time of the document, whereas the modified time of the document is updated to the time of export on exporting.
> * When a user clicks the Print option, the last printed time is changed to the current time.