# Excel 가져오기 및 내보내기
## Content
SpreadJS는 다음과 같은 방법으로 Excel 파일 가져오기 및 내보내기를 지원합니다.
* 클라이언트 측에서 Excel 가져오기 및 내보내기
* SJS 파일 형식을 사용한 가져오기 및 내보내기
* 암호화된 Excel 파일 가져오기 및 내보내기
## 클라이언트 측 가져오기 및 내보내기
클라이언트 측에서 `import` 및 `export` 메서드를 사용하여 Excel 파일(.xlsx, .xltx, .xlsm, .xltm)을 JSON으로 가져오고 JSON 개체를 Excel로 내보낼 수 있습니다.
내보낸 Excel 파일은 인터넷에서 생성된 파일로 인식되어 잠금 상태가 됩니다. Excel 내보내기는 서버가 아닌 클라이언트 측에서 수행됩니다. 따라서 클라이언트 측 다운로드로 인해 파일이 잠기게 됩니다. 이 때문에 Excel 파일을 처음 열 때 경고 메시지가 표시됩니다.
위젯을 올바르게 표시하려면 ``을 포함해야 하며, Excel 파일 가져오기 및 내보내기를 위해 `gc.spread.sheets.io.x.x.x.min.js` 참조 파일을 추가해야 합니다.
Excel 파일을 로컬에 다운로드하거나 반환된 Excel 파일(blob 형식)을 서버로 전송할 수 있습니다.
### 코드 사용
이 예제는 Excel 파일을 가져오고 내보냅니다. 코드의 첫 번째 부분에는 클라이언트 측 가져오기 및 내보내기에 필요한 종속성이 포함되어 있습니다.
```javascript
```
## SJS 파일 형식을 사용한 가져오기 및 내보내기
`open` 및 `save` 메서드를 사용하여 Excel 파일(.xlsx, .xltx, .xlsm, .xltm)을 .SJS(SpreadJS 파일 형식)로 가져오고 .SJS 파일을 Excel로 내보낼 수 있습니다.
.SJS 형식을 사용하면 매우 큰 Excel 파일을 처리할 때 로드 시간과 메모리 사용량을 크게 개선할 수 있습니다. 또한 다시 저장할 경우 파일 크기도 크게 줄어듭니다.
이 예제는 open 및 save 메서드를 사용하여 Excel 파일을 열고 저장합니다.
```javascript
// SJS 파일을 Spread로 엽니다.
function OpenFile()
{
var excelFile = document.getElementById("fileDemo").files[0];
spread.open(excelFile, () => {
}, function (e) {
console.log(e);
});
}
// Spread를 xlsx 파일로 저장합니다.
function SaveFile()
{
var fileName = document.getElementById("exportFileName").value;
if (fileName.substr(-5, 5) !== '.xlsx')
{ fileName += '.xlsx'; }
spread.save(sjs, function (blob) {
saveAs(blob, fileName);
}, function (e) {
console.log(e);
});
}
```
다음 표는 Excel 파일에서 가져오거나 Excel 파일로 내보낼 수 있는 기능을 나열합니다.
| 범주 | 설명 | 가져오기(Excel → JSON) | 내보내기(JSON → Excel) |
| --- | --- | ------------------ | ------------------ |
| workbook(spread) | tabstrip: tabStripVisible, startSheetIndex, tabStripRatio, tabColor | √ | √ |
| | scrollbar: showHorizontalScrollbar, showVerticalScrollbar | √ | √ |
| | sheets: 시트 표시 여부, 시트 이름 | √ | √ |
| | 참조 스타일: R1C1 또는 A1 | √ | √ |
| | 사용자 지정 이름 | √ | √ |
| sharedStrings | 시트 데이터에 사용되는 문자열(공통 문자열, 공백 포함 문자열) | √ | √ |
| theme | 색상 구성표 | √ | √ |
| | 글꼴 구성표(SpreadJS는 세부 글꼴 구성표를 지원하지 않음) | √ | √ |
| | 서식 구성표(SpreadJS는 서식 구성표를 지원하지 않음) | X | √ |
| style | cellStyles: SpreadJS가 지원하는 모든 스타일 | √ | √ |
| | 다양한 서식(테이블, 조건부 서식, 필터에 사용되는 서식) | √ | √ |
| | tableStyles | √ | √ |
| worksheet | rowRangeGroup, colRangeGroup | √ | √ |
| | rowCount 및 columnCount | √ | √ |
| | showZeros | √ | √ |
| | 눈금선 표시 여부, 눈금선 색상 | √ | √ |
| | 행 머리글 및 열 머리글 표시 여부 | √ | √ |
| | 확대/축소 | √ | √ |
| | 선택 영역 | √ | √ |
| | activeRow, activeColumn | √ | √ |
| | 고정(frozenRowCount, frozenColumnCount) | √ | √ |
| | 기본 rowHeight, 기본 columnWidth | √ | √ |
| | columnInfo: 열 너비, 열 표시 여부, 열 스타일 | √ | √ |
| | 병합 셀(span) | √ | √ |
| | 보호된 시트 | √ | √ |
| | rowInfo: 행 높이, 행 표시 여부, 행 스타일 | √ | √ |
| | cellInfo: 셀 값, 셀 수식, 셀 스타일 | √ | √ |
| | 사용자 지정 이름 | √ | √ |
| | 조건부 서식 | √ | √ |
| | 메모(Comment) | √ | √ |
| | 그림 | √ | √ |
| | 슬라이서 | √ | √ |
| | 스파크라인 | √ | √ |
| | 테이블 | √ | √ |
| | 필터 | √ | √ |
| | 유효성 검사 | √ | √ |
| | 개요(Outline) | √ | √ |
| | 인쇄 | √ | √ |
## 매크로와 함께 가져오기 및 내보내기
SpreadJS는 Excel 매크로 사용 통합 문서(.xlsm) 및 Excel 매크로 사용 서식 파일(.xltm)에 대해 손실 없는 가져오기 및 내보내기를 지원합니다.
즉, 이러한 파일 형식을 SpreadJS 환경에서 업로드 및 저장할 수 있으며, 포함된 VBA 매크로도 Microsoft Excel에서 다시 열었을 때 유지되고 정상적으로 동작합니다.
### 보안 및 제한 사항
* 매크로 위험
* 악성 코드 경고: Excel은 신뢰할 수 없는 출처(예: 인터넷 다운로드)의 매크로를 차단합니다. 사용자는 내보낸 파일을 다시 열 때 수동으로 매크로를 활성화해야 합니다.
* 보안 설정:
* 매크로 보안에 대한 Microsoft 가이드라인을 따르십시오. [Internet macros blocked by default | Microsoft Learn](https://learn.microsoft.com/en-us/microsoft-365-apps/security/internet-macros-blocked "https://learn.microsoft.com/en-us/microsoft-365-apps/security/internet-macros-blocked")
* 형식 제약 사항
* 매크로 손실:
* .xlsx 또는 SpreadJS 고유 형식(.sjs, .ssjson)으로 내보내면 매크로가 제거됩니다.
* 매크로 편집 불가:
* SpreadJS에서는 매크로를 조회, 편집 또는 실행할 수 없습니다.
* SpreadJS에서 워크시트 레이아웃을 변경하면 특정 셀 주소를 참조하는 매크로 로직에 영향을 줄 수 있습니다.
### 코드 사용
이 예제는 import/export 메서드에서 `excelFileType` 매개 변수를 `'XLSM'`으로 설정하여 .xlsm 파일을 가져오고 내보내는 방법을 보여줍니다.
```javascript
// 파일 이름
var fileName = "fileNamehere.xlsm";
// 내보내기
spread.export(function (blob) {
// blob을 파일로 저장
saveAs(blob, fileName);
}, function (e) {
console.log(e);
}, {
fileType: GC.Spread.Sheets.FileType.excel,
excelFileType: 'XLSM'
});
// 파일 blob 가져오기
var file = document.getElementById("fileInput").files[0];
// 가져오기
spread.import(file, function () {
// 성공 콜백
}, function (e) {
console.log(e); // 오류 콜백
}, {
fileType: GC.Spread.Sheets.FileType.excel
excelFileType: 'XLSM'
});
```
## 암호화된 Excel 파일 가져오기 및 내보내기
애플리케이션에 다음 IO 참조를 추가하여 암호화된 Excel 파일을 가져오고 내보낼 수 있습니다.
``
### 암호화된 Excel 파일 가져오기
암호로 보호된 Excel 파일을 가져오려면 Spread의 `import` 메서드에 `password` 속성을 전달해야 합니다.
올바른 암호를 제공하면 파일이 정상적으로 가져와집니다. 잘못된 암호를 제공하면 `errorCallBack` 함수가 호출되어 오류를 반환합니다.
[ErrorCode](/spreadjs/api/v19/enums/GC.Spread.Sheets.IO.ErrorCode) 열거형의 멤버를 사용하여 오류 메시지를 지정할 수 있습니다.
다음 코드는 암호화된 Excel 파일을 가져오는 예제입니다.
```javascript
const userPassword = 'Asdf0123';
// 암호가 있는 Excel 파일 가져오기
const errorCallback = (e) => {
if (e.errorCode = GC.Spread.Sheets.IO.errorCode.invalidPassword) {
console.log('Invalid Password!');
} else if (e.errorCode = GC.Spread.Sheets.IO.errorCode.noPassword) {
console.log('Please enter the password!');
}
}
spread.import(file, () => { }, errorCallback, {
fileType: GC.Spread.Sheets.FileType.excel,
password: userPassword,
})
```
### 암호화된 Excel 파일 내보내기
Spread의 `export` 메서드에서 `password` 속성을 지정하여 암호로 보호된 Excel 파일을 내보낼 수 있습니다.
암호가 지정되면 암호화된 Excel 파일로 내보내며, 암호가 없으면 암호화되지 않은 원본 Excel 파일로 내보냅니다.
다음 코드는 암호화된 Excel 파일을 내보내는 예제입니다.
```javascript
const userPassword = 'ABC0123';
const fileName = 'encrypt-export.xlsx';
// 암호가 있는 Excel 파일 내보내기
spread.export(
blob => saveAs(blob, fileName),
e => console.log(e),
{
fileType: GC.Spread.Sheets.FileType.excel,
password: userPassword,
}
);
```
### 디자이너 사용
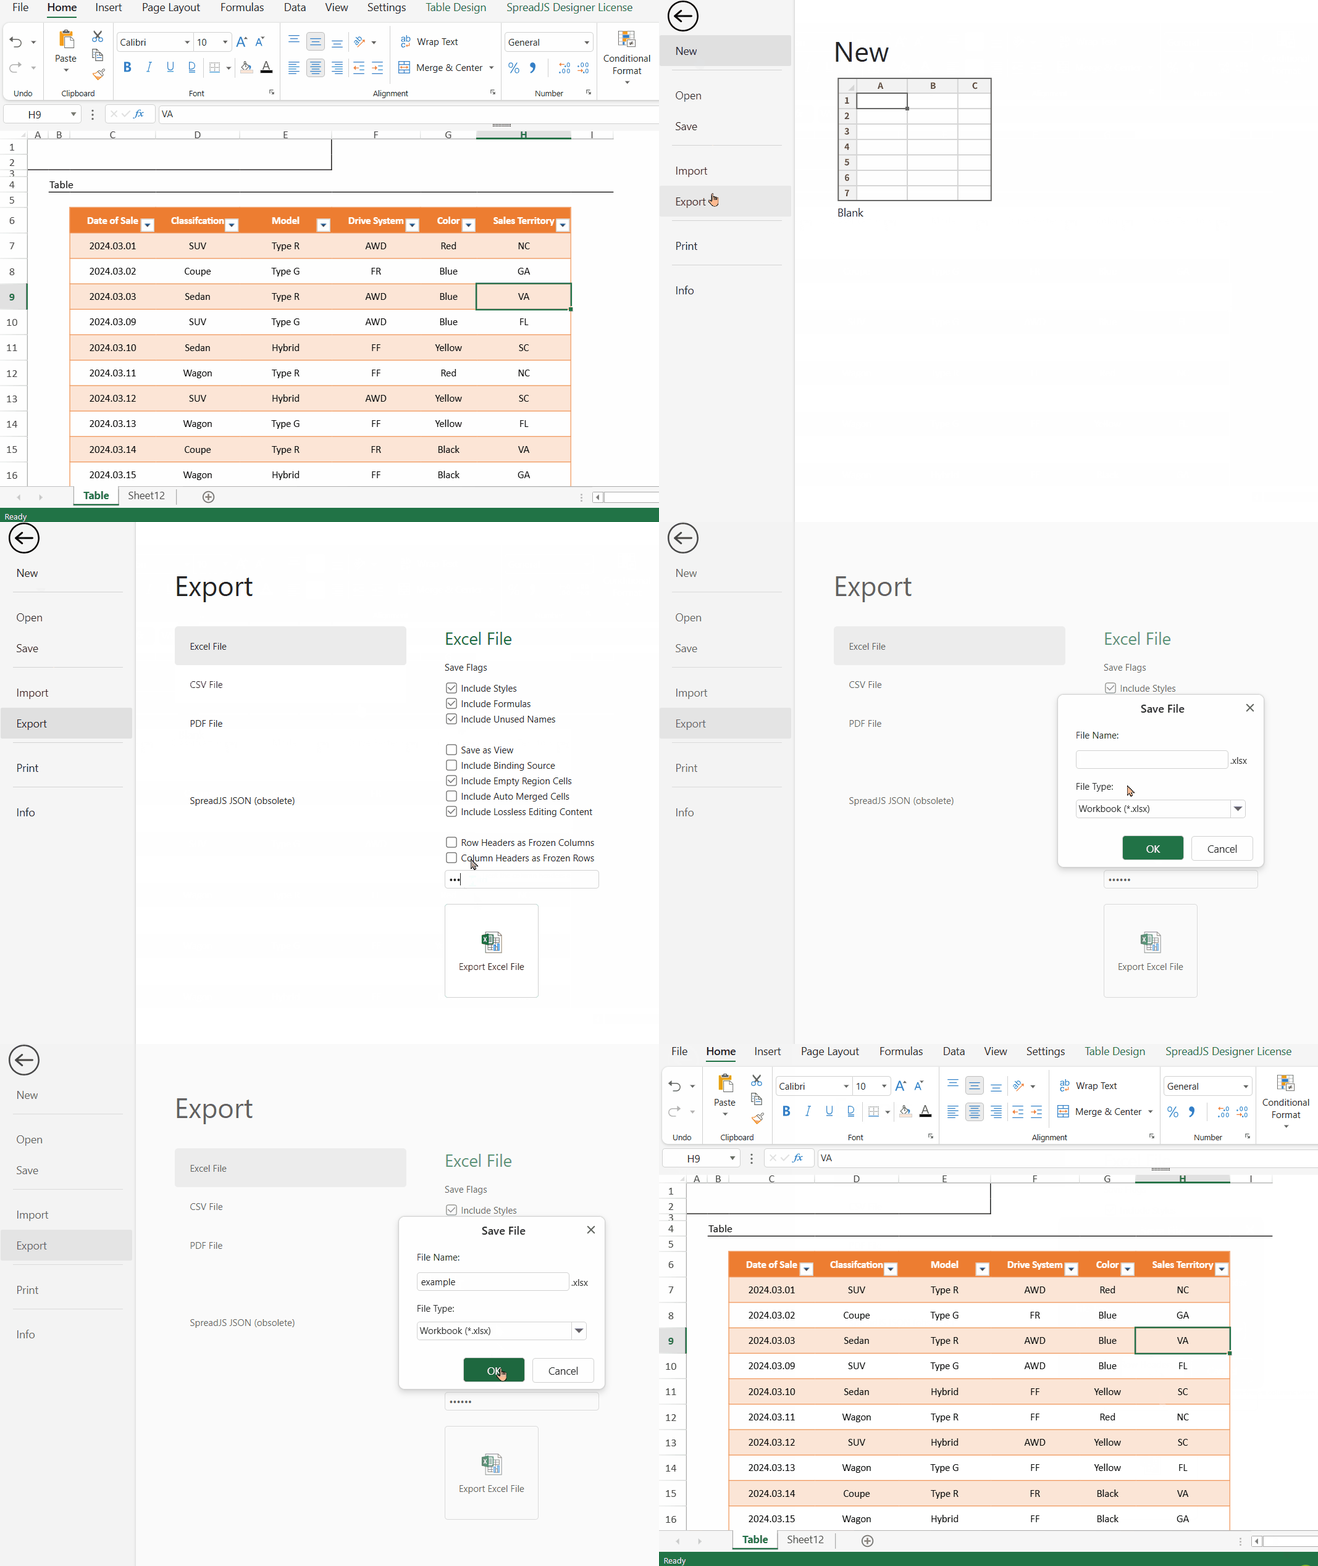
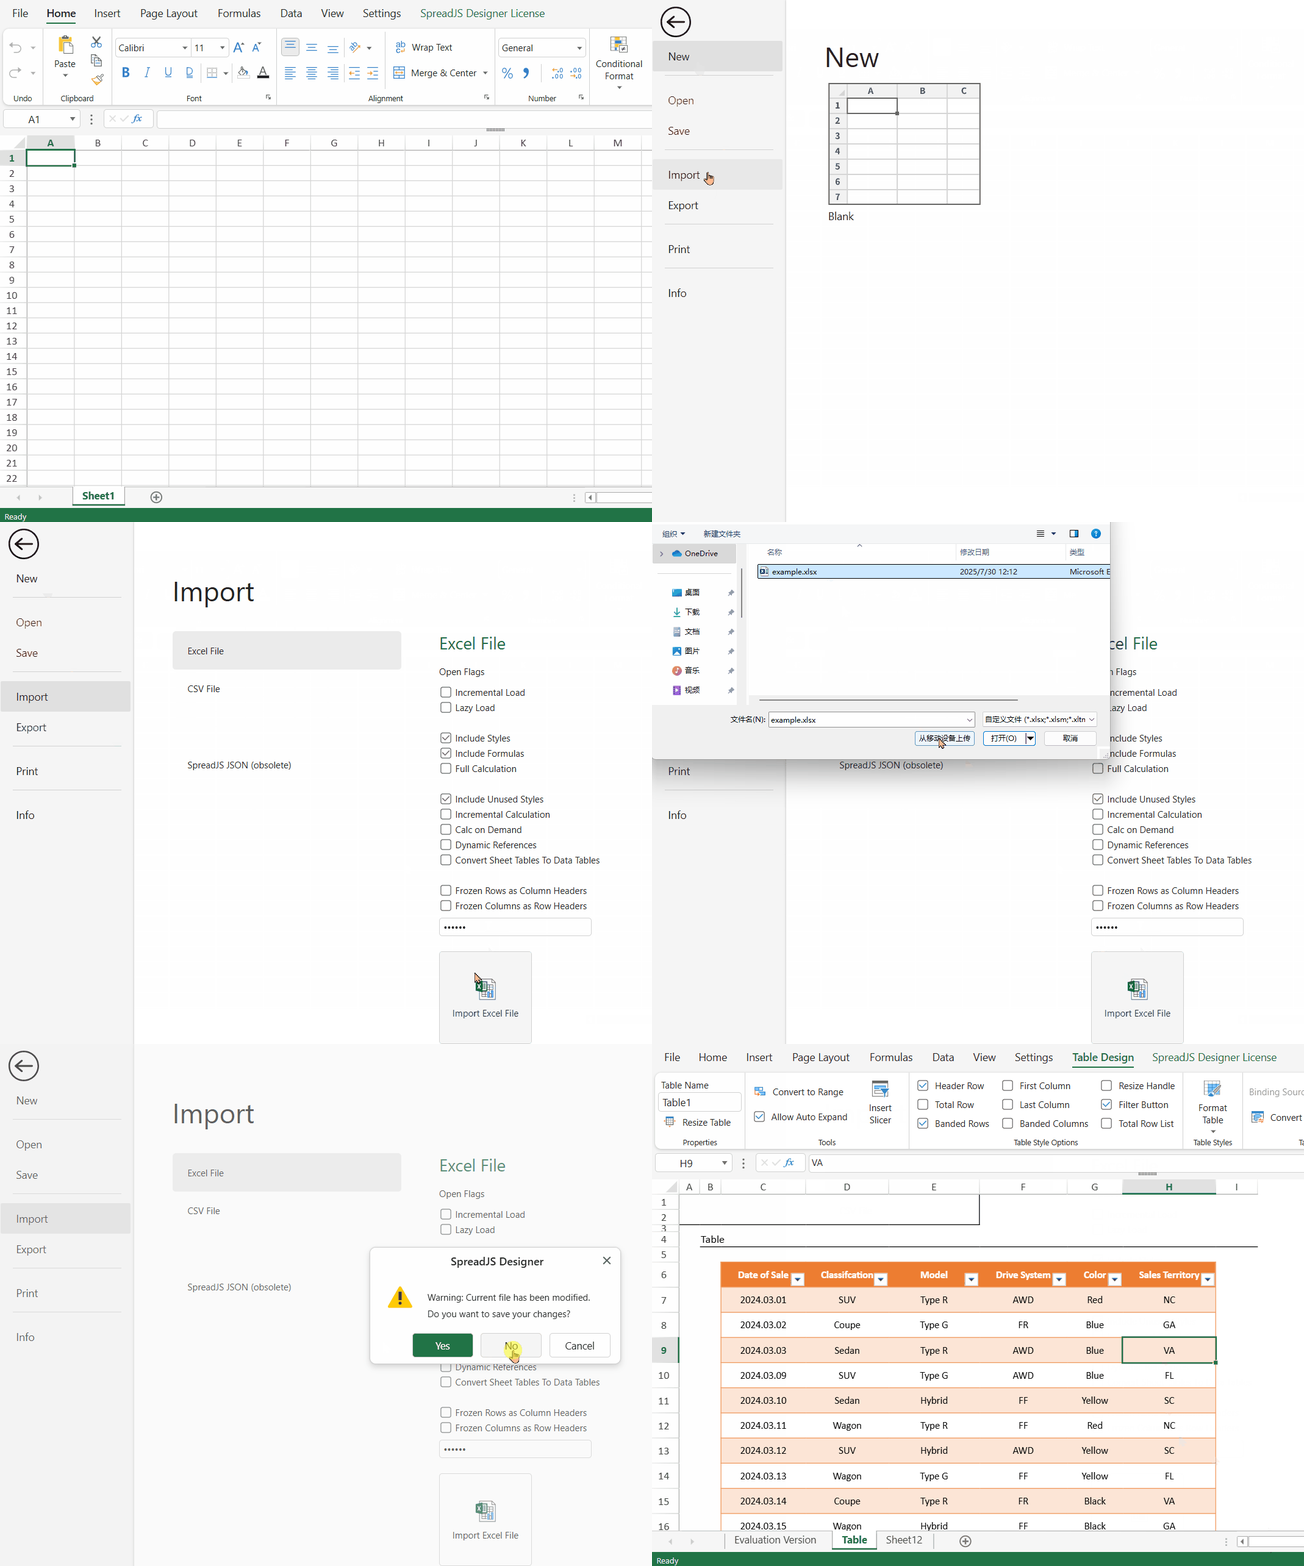
SpreadJS 디자이너에서도 보호된 Excel 파일을 가져오거나 내보낼 때 암호를 지정할 수 있습니다.
암호화된 Excel 파일을 가져오려면 **파일(File)** 을 클릭한 다음 **가져오기(Import)** 를 선택합니다. **가져오기(Import)** 메뉴에서 **Excel 파일(Excel File)** 을 선택하고 가져오기 설정을 지정한 후 **암호(Password)** 상자에 암호를 입력하고 **Excel 파일 가져오기(Import Excel File)** 를 클릭합니다.
암호화된 Excel 파일을 내보내려면 **파일(File)** 을 클릭한 다음 **내보내기(Export)** 를 선택합니다. **내보내기(Export)** 메뉴에서 **Excel 파일(Excel File)** 을 선택하고 내보내기 설정을 지정한 후 **암호(Password)** 상자에 암호를 입력하고 **Excel 파일 내보내기(Export Excel File)** 를 클릭합니다.