
데이터 바인딩
SpreadJS는 배열 객체 및 Knockout.observableArray에 대한 바인딩을 지원합니다. SpreadJS는 또한 셀 수준 바인딩(cell-level binding)을 지원하여 임의의 객체에 바인딩할 수 있도록 합니다.
SpreadJS는 양방향 데이터 바인딩을 지원합니다.
셀 바인딩
SpreadJS에서는 셀 수준 바인딩을 사용할 수 있습니다. 셀 수준 바인딩은 객체의 속성을 시트의 셀에 바인딩합니다. 셀을 바인딩하기 전에 데이터 객체를 GGC.Spread.Sheets.Bindings.CellBindingSource로 래핑합니다.
그런 다음 래핑된 소스를 시트에 바인딩합니다 (sheet.setDataSource).
다음 코드 샘플은 시트의 셀을 바인딩하는 예시 코드입니다.
var person = {name: "Wang feng", age: 25, address: {postcode: "710075"}};
var source = new GC.Spread.Sheets.Bindings.CellBindingSource(person);
activeSheet.setBindingPath(0, 0, "name");
activeSheet.setBindingPath(1, 1, "age");
activeSheet.setBindingPath(3, 3, "address.postcode");
activeSheet.setDataSource(source);
열 바인딩
bindColumn 메서드를 사용하여 특정 열을 바인딩할 수 있습니다.
다음 코드 샘플은 bindColumn 메서드를 사용하여 특정 열을 바인딩합니다:
var datasource = [
    { name: "Alice", age: 27, birthday: "1985/08/31", position: "PM" },
    { name: "Aimee", age: 28, birthday: "1984/07/31", position: "TL" },
    { name: "Charles", age: 29, birthday: "1983/03/31", position: "QC" },
    { name: "Fred", age: 30, birthday: "1982/02/20", position: "DL" },
    { name: "Angelia", age: 31, birthday: "1981/05/30", position: "QC" },
    { name: "Peter", age: 32, birthday: "1980/11/08", position: "QC" }
];
var nameColInfo = { name: "name", displayName: "Name", size: 70 };
var ageColInfo = { name: "age", displayName: "Age", size: 40, resizable: false };
var birthdayColInfo = { name: "birthday", displayName: "Birthday",formatter:"d/M/yy", size: 120 };
var positionColInfo = { name: "position", displayName: "Position", size: 50, visible: false };
activeSheet.autoGenerateColumns = true;
activeSheet.setDataSource(datasource);
activeSheet.bindColumn(0, nameColInfo);
activeSheet.bindColumn(1, ageColInfo);
activeSheet.bindColumn(2, birthdayColInfo);
activeSheet.bindColumn(3, positionColInfo);
다음 코드 샘플은 JSON 배열 객체에 바인딩합니다:
var jsonArray = '{"phoneNumbers": [{"type": "home","number": "212 555-1234"},{"type": "fax","number": "646 555-4567"}]}';
var arr = JSON.parse(jsonArray);
activeSheet.setDataSource(arr.phoneNumbers);
표 바인딩
표를 생성하고 데이터 원본에 바인딩할 수 있습니다.
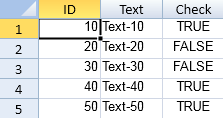
다음 코드 샘플은 표를 수동으로 생성하고 바인딩합니다:
window.onload = function()
{
    var spread =
    new GC.Spread.Sheets.Workbook(document.getElementById("ss"),{sheetCount:3});
    var activeSheet = spread.getActiveSheet();

    // 수동으로 데이터 테이블 생성
    var sampleTable =
    [
        {"ID":10, "Text":"Text-10", "Check":true},
        {"ID":20, "Text":"Text-20", "Check":false},
        {"ID":30, "Text":"Text-30", "Check":false},
        {"ID":40, "Text":"Text-40", "Check":true},
        {"ID":50, "Text":"Text-50", "Check":true}
    ];

    // 데이터 테이블 바인딩
    activeSheet.setDataSource(sampleTable);
}
데이터가 포함된 새 행 추가 및 데이터 원본 업데이트
바인딩 후 행을 추가할 수 있습니다.
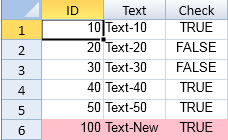
다음 코드 샘플은 마지막 행 이후에 행을 추가합니다:
window.onload = function()
{
    var spread =
    new GC.Spread.Sheets.Workbook(document.getElementById("ss"),{sheetCount:3});
    var activeSheet = spread.getActiveSheet();

    // 수동으로 데이터 테이블 생성
    var sampleTable =
    [
        {"ID":10, "Text":"Text-10", "Check":true},
        {"ID":20, "Text":"Text-20", "Check":false},
        {"ID":30, "Text":"Text-30", "Check":false},
        {"ID":40, "Text":"Text-40", "Check":true},
        {"ID":50, "Text":"Text-50", "Check":true}
    ];

    // 데이터 테이블 바인딩
    spread.getActiveSheet().setDataSource(sampleTable);
    $("#button1").click(function()
    {
        console.log("The number of all rows in the datasource before addition:" + sampleTable.length);

        var activeSheet = spread.getActiveSheet();
        var row = activeSheet.getRowCount();

        // 마지막 행 다음에 행 추가
        activeSheet.addRows(row, 1);

        // 데이터 설정
        activeSheet.setValue(row, 0, 100);
        activeSheet.setValue(row, 1, "Text-New");
        activeSheet.setValue(row, 2, true);
        activeSheet.getCell(row, -1).backColor("pink");

        // 데이터 테이블 업데이트
        console.log("The number of all rows in the datasource after addition:" + sampleTable.length);
        console.log("The value of the Text field in the last row of the datasource: " + sampleTable[sampleTable.length - 1].Text);
    });
}
바인딩되지 않은 열 추가
위젯에 바인딩되지 않은 열을 추가할 수 있습니다.
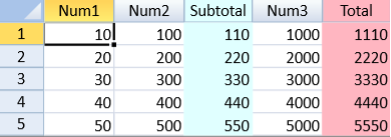
다음 코드 샘플은 바인딩되지 않은 열을 추가합니다:
 $(document).ready(function ()
{
    var spread =
    new GC.Spread.Sheets.Workbook(document.getElementById("ss"),{sheetCount:3});
    var activeSheet = spread.getActiveSheet();
    var rowCount, colCount;

    // 수동으로 데이터 테이블 생성
    var sampleTable =
    [
        {"Num1":10, "Num2":100, "Num3":1000},
        {"Num1":20, "Num2":200, "Num3":2000},
        {"Num1":30, "Num2":300, "Num3":3000},
        {"Num1":40, "Num2":400, "Num3":4000},
        {"Num1":50, "Num2":500, "Num3":5000}
    ];

    // 데이터 테이블 바인딩
    activeSheet.setDataSource(sampleTable);

    // 열 추가 (바인딩되지 않은 열이 될 예정).
    activeSheet.addColumns(2, 1);
    activeSheet.addColumns(activeSheet.getColumnCount(), 1);

    // 소계 표시.
    rowCount = activeSheet.getRowCount();
    spread.options.referenceStyle =
    GC.Spread.Sheets.ReferenceStyle.R1C1;
    activeSheet.setValue(0, 2,
    "Subtotal",  GC.Spread.Sheets.SheetArea.colHeader);

    for(var i = 0; i < rowCount; i++)
    {
        activeSheet.setFormula(i, 2, "SUBTOTAL(9, RC[-2]:RC[-1])");
    }

    activeSheet.getRange(-1, 2, -1, 1).backColor("LightCyan");
    activeSheet.getCell(0, 2, GC.Spread.Sheets.SheetArea.colHeader).backColor("LightCyan");
    activeSheet.setColumnWidth(2, 60);

    // 총계 표시.
    colCount = activeSheet.getColumnCount();
    activeSheet.setValue(0, colCount - 1,
    "Total", GC.Spread.Sheets.SheetArea.colHeader);
    for(var i = 0; i < rowCount; i++)
    {
        activeSheet.setFormula(i, colCount - 1, "SUBTOTAL(9,RC[-4]:RC[-1])");
    }
    activeSheet.getRange(-1, colCount - 1, -1, 1).backColor("LightPink");
    activeSheet.getCell(0, colCount - 1,
    GC.Spread.Sheets.SheetArea.colHeader).backColor("LightPink");
    activeSheet.setColumnWidth(colCount - 1, 60);
});
또한, 셀 바인딩이 포함된 SpreadJS 디자이너 템플릿 문서를 참고하여 주시기 바랍니다.