탭에 요소 추가
SpreadJS 디자이너 컴포넌트는 리본 컴포넌트의 탭에 버튼, 체크박스, 드롭다운 등 다양한 요소를 추가할 수 있도록 합니다. 이를 통해 리본을 필요에 맞게 사용자 정의하여 보다 실용적이고 효과적으로 사용할 수 있습니다.
이 작업들을 수행하려면 아래 단계를 따라야 합니다:
워크북을 초기화하고 활성 시트를 접근합니다.
SpreadJS 디자이너 컴포넌트의 기본 구성 설정에 접근합니다.
새 요소의 레이아웃 구조와 속성을 정의합니다.
새 요소를 탭에 추가합니다.
새 요소와 연동되는 명령(command)을 생성합니다.
새로 구성한 설정을 사용해 디자이너 인스턴스를 초기화합니다.
몇 가지 예제로 이야기해 보겠습니다.
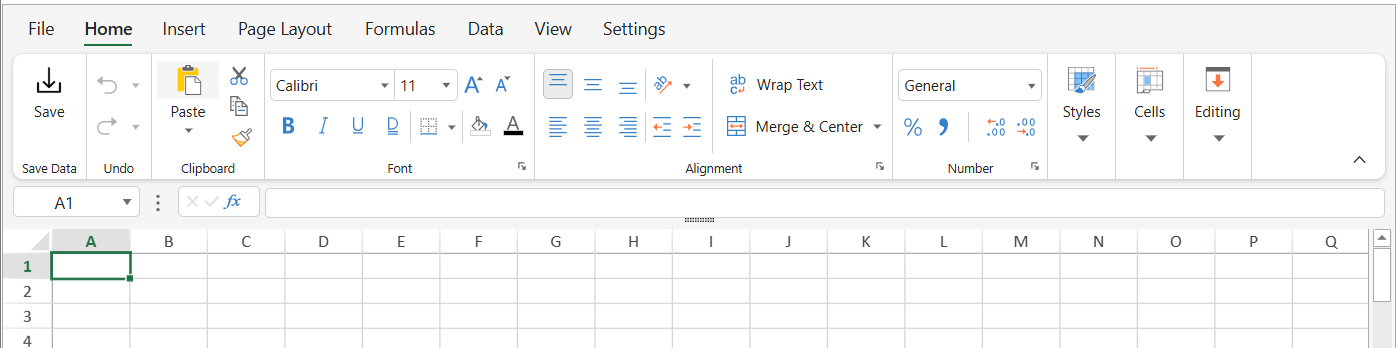
버튼 추가
다음 코드 샘플은 홈 탭에 'Save Data'이라는 이름의 버튼을 추가하는 방법을 보여줍니다.
// 워크북과 워크시트를 설정합니다.
var spread = new GC.Spread.Sheets.Workbook("ss");
var activeSheet = spread.getActiveSheet();

// 기본 구성에 접근합니다.
var config = GC.Spread.Sheets.Designer.DefaultConfig;

// 새 버튼의 레이아웃을 설정합니다.
var saveData = {
    "label": "Save Data",
    "thumbnailClass": "",
    "commandGroup": {
        "children": [
            {
                "direction": "vertical",
                "commands": [
                    "cmdSaveData"
                ]
            }
        ]
    }
}

// 새 버튼을 구성 리본 탭에 추가합니다.
config.ribbon[0].buttonGroups.unshift(saveData);

// 새 버튼에 대한 명령을 생성합니다.
config.commandMap = {
    cmdSaveData: {
        title: "Save data to server",
        text: "Save",
        iconClass: "cmdSaveData",
        bigButton: "true",
        commandName: "cmdSaveData",
        execute: async (context, propertyName, fontItalicChecked) => {
            // customize operator
            alert('Save data successfully.');
        }
    }
}

// 디자이너 인스턴스를 초기화합니다.
var designer = new GC.Spread.Sheets.Designer.Designer(document.getElementById("designerHost"), config, spread);
또한 원한다면 새 버튼에 배경 이미지와 같은 스타일을 설정할 수도 있습니다.
<!-- 새 버튼의 CSS 스타일 설정 -->
<style>.cmdSaveData {
    background-image: url('./saveData.png');
    background-size: 35px 35px;
}
</style>
아래와 같은 결과가 생성됩니다.
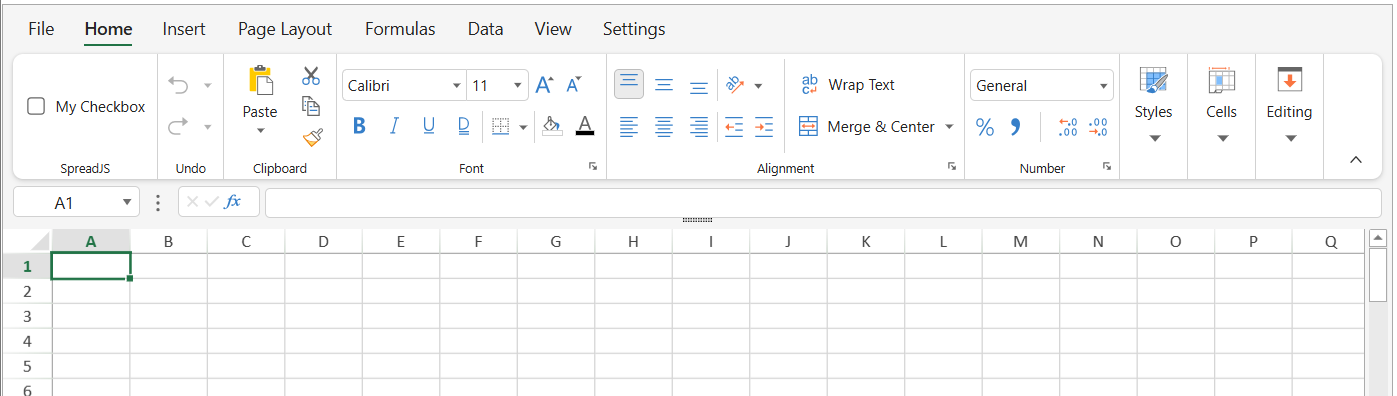
체크박스 추가
탭에 체크박스를 추가하고, 체크 여부에 따라 상태를 전환할 수 있습니다.
다음 코드 샘플은 홈 탭에 'My Checkbox'라는 사용자 정의 체크박스를 추가하는 방법을 보여줍니다.
// 워크북과 워크시트를 설정합니다.
var spread = new GC.Spread.Sheets.Workbook("ss");
var activeSheet = spread.getActiveSheet();

// 기본 구성에 접근합니다.
var config = GC.Spread.Sheets.Designer.DefaultConfig;

// 새 체크박스의 레이아웃을 설정합니다.
var NewCheckBox = {
     "label": "SpreadJS",
     "thumbnailClass": "",
     "commandGroup": {
         "children": [
             {
                 "direction": "vertical",
                 "commands": [
                     "MyCheckbox"
                 ]
             }
         ]
     }
}

// 설정 리본 탭에 새 체크박스를 추가하세요.
config.ribbon[0].buttonGroups.unshift(NewCheckBox);

// 새 체크박스를 위한 명령을 생성하세요.
config.commandMap = {
     MyCheckbox: {
         title: "Custom Checkbox",
         text: "My Checkbox",
         type: 'checkbox',
         commandName: "MyCheckbox",
         execute: async (context, propertyName) => {
             let state = context.getData("myCheckState");
             context.setData("myCheckState", !state);
         },
         getState: (context) => {
             return context.getData("myCheckState");
         }
     }
}

// 디자이너 인스턴스를 초기화하세요.
var designer = new GC.Spread.Sheets.Designer.Designer(document.getElementById("designerHost"), config, spread);
아래와 같은 결과가 생성됩니다.
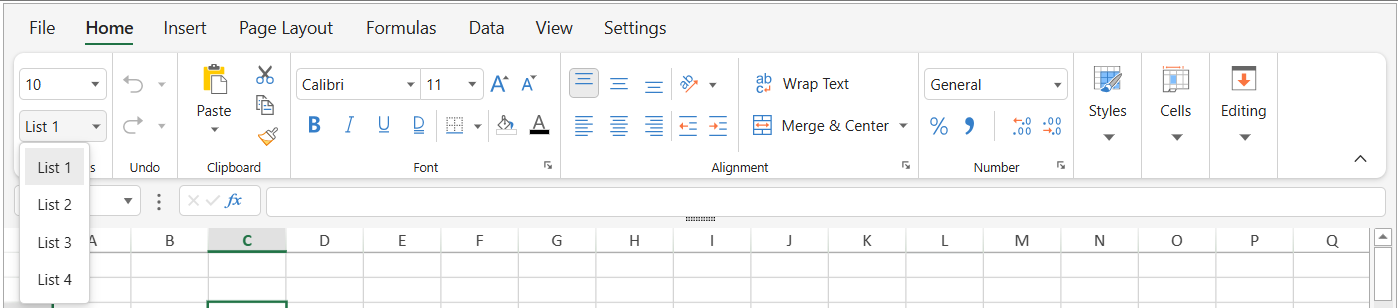
드롭다운 추가
리본 탭에 편집 가능한 드롭다운과 편집 불가능한 드롭다운을 모두 추가할 수 있습니다.
다음 코드 예제는 홈 탭에 드롭다운을 추가하는 방법을 보여줍니다.
// 워크북을 초기화하고 활성 시트를 가져오세요.
var spread = new GC.Spread.Sheets.Workbook("ss");
let sheet = spread.getSheet(0);

// 기본 구성에 접근하세요.
var config = GC.Spread.Sheets.Designer.DefaultConfig;

// 편집 가능한 드롭다운을 생성하고 명령 객체를 정의하세요.
const customDropDownList1 = [
        { text: "10", value: 10 },
        { text: "20", value: 20 },
        { text: "30", value: 30 },
        { text: "40", value: 40 },
        { text: "50", value: 50 }
];
const customCommand1 = {
        title: "Custom Command 1",
        type: "editableSelect",
        width: 70,
        commandName: "customCommand1",
        enableContext: "true",
        dropdownList: customDropDownList1,
        execute: function (context, value) {
            let spreadObj = context.getWorkbook();
            let activeSheet = spreadObj.getActiveSheet();
            let cellTag = activeSheet.getTag(activeSheet.getActiveRowIndex(), activeSheet.getActiveColumnIndex());
            let newCellTag = {
                ...cellTag,
                "customCommand1": value
            }
            activeSheet.setTag(activeSheet.getActiveRowIndex(), activeSheet.getActiveColumnIndex(), newCellTag);
        },
        getState: function (context) {
            let spreadObj = context.getWorkbook();
            let activeSheet = spreadObj.getActiveSheet();
            let cellTag = activeSheet.getTag(activeSheet.getActiveRowIndex(), activeSheet.getActiveColumnIndex());
            if (cellTag && cellTag.customCommand1) {
                const nearestValue = findNearestValue(cellTag.customCommand1, customDropDownList1);
                return nearestValue.value;
            }
            return customDropDownList1[0].value;
        }
}

// 편집 불가능한 드롭다운을 생성하고 명령 객체를 정의하세요.
const customDropDownList2 = [
        { text: "List 1", value: "value1" },
        { text: "List 2", value: "value2" },
        { text: "List 3", value: "value3" },
        { text: "List 4", value: "value4" }
];
const customCommand2 = {
        title: "Custom Command 2",
        type: "comboBox",
        text: "Custom Command 2",
        comboWidth: 70,
        commandName: "customCommand2",
        dropdownMaxHeight: 500,
        dropdownList: customDropDownList2,
        execute: function (context, value) {
            let spreadObj = context.getWorkbook();
            let activeSheet = spreadObj.getActiveSheet();
            let cellTag = activeSheet.getTag(activeSheet.getActiveRowIndex(), activeSheet.getActiveColumnIndex());
            let newCellTag = {
                ...cellTag,
                "customCommand2": value
            }
            activeSheet.setTag(activeSheet.getActiveRowIndex(), activeSheet.getActiveColumnIndex(), newCellTag);
        },
        getState: function (context) {
            let spreadObj = context.getWorkbook();
            let activeSheet = spreadObj.getActiveSheet();
            let cellTag = activeSheet.getTag(activeSheet.getActiveRowIndex(), activeSheet.getActiveColumnIndex());
            if (cellTag && cellTag.customCommand2) {
                return cellTag.customCommand2;
            }
            return customDropDownList2[0].value;
        }
}

// 새 드롭다운의 레이아웃을 설정하세요.
var newDropDowns = {
        "label": "DropDowns",
        commandGroup: {
            children: [
                {
                    direction: "vertical",
                    commands: [
                        "customCommand1",
                        "customCommand2"
                    ]
                }
            ]
        }
}

// 새 드롭다운을 홈 탭에 추가하세요.
config.ribbon[0].buttonGroups.unshift(newDropDowns);

// 새 드롭다운을 위한 명령을 생성하세요.
config.commandMap = {
        "customCommand1": customCommand1,
        "customCommand2": customCommand2
}

// 사용자 입력을 기준으로 드롭다운 목록에서 가장 가까운 값을 결정하세요.
function findNearestValue(value, customDropDownList) {
        return customDropDownList.reduce((prev, curr) =>
            Math.abs(curr.value - value) < Math.abs(prev.value - value) ? curr : prev
        );
}

// 디자이너 인스턴스를 초기화하세요.
var designer = new GC.Spread.Sheets.Designer.Designer(document.getElementById("designerHost"), config, spread);
아래 결과가 생성됩니다.