
- SpreadJS 개요
- 시작하기
- JavaScript 프레임워크
- 모범 사례
- 기능
- SpreadJS 템플릿 디자이너
- SpreadJS 디자이너 컴포넌트
- 터치 지원
- 수식 참조
- 가져오기 및 내보내기 참조
- 자주 사용하는 이벤트
- API 문서
- 릴리스 노트
테이블 시트 관계
테이블 시트는 관계를 생성하여 동일한 뷰에 여러 데이터 테이블을 바인딩할 수 있는 기능을 제공합니다.
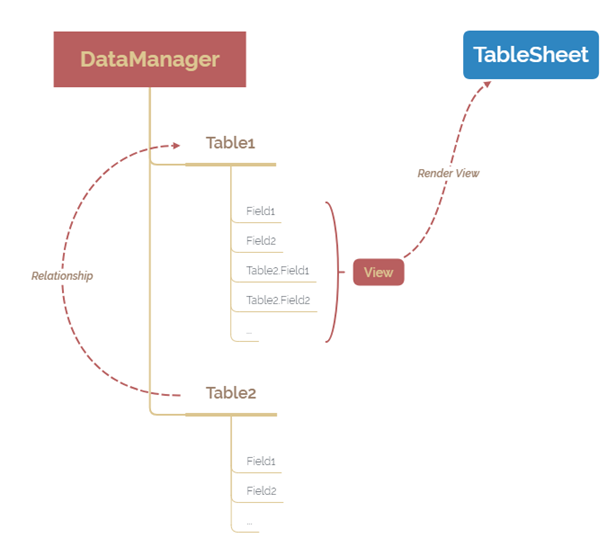
위의 순서도 이미지에 표시된 것처럼, 테이블 시트 관계는 관련 테이블과 관련 필드를 정의하며, 기본 키 및 외래 키 관계가 있는 테이블 구조에서 널리 사용될 수 있습니다. 관계에 포함된 두 데이터 테이블은 데이터 매니저 내에서 양방향 바인딩으로 작동하며, 두 테이블의 모든 속성에 접근할 수 있습니다.
다음 단계는 "Sales"와 "Customers" 테이블 간에 테이블 시트 관계를 추가하는 방법을 보여줍니다.
addTable 메서드를 사용하여 여러 테이블을 data manager에 추가합니다. lookup 열을 사용하여 열 값을 표현하고 수정합니다.
//dataManager에 고객 테이블 추가
var customerTable = dataManager.addTable("customerTable", {
    remote: {
        read: {
            url: 'https://demodata.grapecity.com/wwi/api/v1/customers'

        }
    }
});

// dataManager에 세일즈 테이블 추가
    var salesTable = dataManager.addTable("salesTable", {
                remote: {
                    read: {
                        url: 'https://demodata.grapecity.com/wwi/api/v1/sales?PageNumber=10&PageSize=500'
                    }
                },
                schema: {
                    columns: {
                        customerKey: {
                            //                lookup: "myCustomer"
                            lookup: {
                                name: "myCustomer", columns: [
                                    { value: "customerKey", width: 100, caption: "Customer Key" },
                                    { value: "customer", width: "*", caption: "Customer" },
                                    { value: "category", width: 100, caption: "Category" }
                                ]
                            }
                        }
                    }
                }
addRelationship 메서드를 사용하여 테이블 간 관계를 추가합니다.
이 메서드는 소스 테이블, 필드 이름, 관계 이름, 대상 테이블, 필드 이름 및 관계 이름을 인수로 받습니다.
아래 코드 예제에서는
"customerTable"이 대상 테이블이고"customerKey"가 두 테이블을 연결하는 외래 키입니다.//세일즈 테이블과 고객 테이블 사이 관계 추가 dataManager.addRelationship(salesTable, "customerKey", "myCustomer", customerTable, "customerKey", "mySales");관계형 View에서 사용될 다중 열 드롭다운 뷰를 생성합니다.
//사용자 정의 뷰 추가
customerTable.fetch().then(function () {
    var selectView = customerTable.addView("customersView",
        [
{ value: 'customerKey' },
{ value: 'customer' },
{ value: 'category' }
        ]);

    // 관계형 뷰 다중 열 드롭다운 생성
    var multiSelectStyle = {
        formatter: '{{=IFERROR(CONCAT([@myCustomer.customer], ", ", [@myCustomer.customerKey]), "")}}',
    };
테이블 시트에 뷰를 바인딩합니다.
var myView = salesTable.addView("myView", [
    { value: "saleKey", width: 100, caption: "Sale Key" },
    { value: "salesPerson", width: 150, caption: "Sales Person" },
    { value: "customerKey", width: 350, caption: "Customer Information", style: multiSelectStyle },
    { value: "address", width: 350, caption: "Address" },
    { value: "stockItem", width: 350, caption: "Stock Item" },
    { value: "quantity", width: 100, caption: "Quantity" }
]);
myView.fetch().then(function () {
    console.log(myView);
    // 테이블 시트에 사용자정의 뷰 설정
    tableSheet.setDataView(myView);
});