


표 바인딩
SpreadJS에서는 셀 수준 바인딩을 사용하여 테이블을 데이터 소스에 바인딩할 수 있습니다.
테이블 바인딩은 두 가지 방법으로 수행할 수 있습니다. 스프레드시트에서 작업할 때 bindColumns 메서드 또는 bind 메서드를 사용하여 테이블을 데이터 소스에 바인딩할 수 있습니다.
워크시트에서 테이블 바인딩 작업을 수행할 때는 다음 규칙에 유의해야 합니다.
값을 설정하면 데이터 소스가 변경됩니다.
행을 추가하거나 삭제하면 데이터 소스가 변경됩니다.
열을 추가하거나 삭제해도 데이터 소스는 변경되지 않습니다.
테이블을 제거, 지우기, 이동 또는 크기 조정해도 데이터 소스는 변경되지 않습니다.
바인딩하면 테이블의 행 수가 자동으로 조정됩니다(열 수는 그대로 유지됩니다).
수식은 데이터 소스에 저장되지 않습니다.
테이블 열 바인딩
워크시트의 모든 테이블 열을 바인딩하려면 시트를 데이터 소스에 바인딩한 다음 Table 클래스의 bindColumns 및 bindingPath 메서드를 설정합니다. 또한 TableColumn 클래스의 dataField 및 name 메서드를 사용하여 테이블 열에 대한 정보를 지정할 수도 있습니다.
다음 코드는 bindColumns 메서드와 bindingPath 메서드를 사용하여 데이터 소스를 테이블에 바인딩합니다.
$(function ()
{
    // Generate two data sources
    function Company(name, logo, slogan, address, city, phone, email) {
        this.name = name;
        this.logo = logo;
        this.slogan = slogan;
        this.address = address;
        this.city = city;
        this.phone = phone;
        this.email = email;
    }
    function Customer(id, name, company) {
        this.id = id;
        this.name = name;
        this.company = company;
    }
    function Record(description, quantity, amount) {
        this.description = description;
        this.quantity = quantity;
        this.amount = amount;
    }
    function Invoice(company, number, date, customer, receiverCustomer, records) {
        this.company = company;
        this.number = number;
        this.date = date;
        this.customer = customer;
        this.receiverCustomer = receiverCustomer;
        this.records = records;
    }
    var company1 = new Company("Baidu", null, "We know everything!", "Beijing 1st road", "Beijing", "010-12345678", "baidu@baidu.com"),
    company2 = new Company("Tecent", null, "We have everything!", "Shenzhen 2st road", "Shenzhen", "0755-12345678", "tecent@qq.com"),
    company3 = new Company("Alibaba", null, "We sell everything!", "Hangzhou 3rd road", "Hangzhou", "0571-12345678", "alibaba@alibaba.com"),
    customer1 = new Customer("A1", "employee 1", company2),
    customer2 = new Customer("A2", "employee 2", company3),
    records1 = [new Record("Finance charge on overdue balance at 1.5%", 1, 150), new Record("Invoice #100 for $1000 on 2014/1/1", 1, 150)],
    records2 = [new Record("Purchase server device", 2, 15000), new Record("Company travel", 100, 1500), new Record("Company Dinner", 100, 200)],
    invoice1 = new Invoice(company1, "00001", new Date(2014, 0, 1), customer1, customer1, records1),
    invoice2 = new Invoice(company2, "00002", new Date(2014, 6, 6), customer2, customer2, records2),
    dataSource1 = new GC.Spread.Sheets.Bindings.CellBindingSource(invoice1),
    dataSource2 = new GC.Spread.Sheets.Bindings.CellBindingSource(invoice2);
    function BindingPathCellType() {
        GC.Spread.Sheets.CellTypes.Text.call(this);
    }
    BindingPathCellType.prototype = new GC.Spread.Sheets.CellTypes.Text();
    BindingPathCellType.prototype.paint = function (ctx, value, x, y, w, h, style, context) {
        if \(value === null \|\| value === undefined\) \{
            var sheet = context.sheet, row = context.row, col = context.col;
            if \(sheet && \(row === 0 \|\| \!\!row\) && \(col === 0 \|\| \!\!col\)\) \{
                var bindingPath = sheet.getBindingPath(context.row, context.col);
                if (bindingPath) {
                    value = "[" + bindingPath + "]";
                }
            }
        }
        GC.Spread.Sheets.CellTypes.Text.prototype.paint.apply(this, arguments);
    };
    var spread = new GC.Spread.Sheets.Workbook(document.getElementById("ss"), {sheetCount: 1});
    activeSheet = spread.getActiveSheet();
    spread.suspendPaint();
    activeSheet.name("FINANCE CHARGE");
    var bindingPathCellType = new BindingPathCellType();
    activeSheet.getCell(1, 2).bindingPath("company.slogan").cellType(bindingPathCellType).vAlign(GC.Spread.Sheets.VerticalAlign.bottom);
    activeSheet.getCell(1, 4).value("INVOICE").foreColor("#58B6C0").font("33px Arial");
    activeSheet.getCell(3, 1).bindingPath("company.name").cellType(bindingPathCellType).foreColor("#58B6C0").font("bold 20px Arial");
    activeSheet.getCell(5, 1).bindingPath("company.address").cellType(bindingPathCellType);
    activeSheet.getCell(5, 3).value("INVOICE NO.").font("bold 15px Arial");
    activeSheet.getCell(5, 4).bindingPath("number").cellType(bindingPathCellType);
    activeSheet.getCell(6, 1).bindingPath("company.city").cellType(bindingPathCellType);
    activeSheet.getCell(6, 3).value("DATE").font("bold 15px Arial");
    activeSheet.getCell(6, 4).bindingPath("date").cellType(bindingPathCellType).formatter("MM/dd/yyyy").hAlign(GC.Spread.Sheets.HorizontalAlign.left);
    activeSheet.getCell(7, 1).bindingPath("company.phone").cellType(bindingPathCellType);
    activeSheet.getCell(7, 3).value("CUSTOMER ID").font("bold 15px Arial");
    activeSheet.getCell(7, 4).bindingPath("customer.id").cellType(bindingPathCellType);
    activeSheet.getCell(8, 1).bindingPath("company.email").cellType(bindingPathCellType);
    activeSheet.getCell(10, 1).value("TO").font("bold 15px Arial");
    activeSheet.getCell(10, 3).value("SHIP TO").font("bold 15px Arial");
    activeSheet.getCell(11, 1).bindingPath("customer.name").cellType(bindingPathCellType).textIndent(10);
    activeSheet.getCell(12, 1).bindingPath("customer.company.name").cellType(bindingPathCellType).textIndent(10);
    activeSheet.getCell(13, 1).bindingPath("customer.company.address").cellType(bindingPathCellType).textIndent(10);
    activeSheet.getCell(14, 1).bindingPath("customer.company.city").cellType(bindingPathCellType).textIndent(10);
    activeSheet.getCell(15, 1).bindingPath("customer.company.phone").cellType(bindingPathCellType).textIndent(10);
    activeSheet.getCell(11, 4).bindingPath("receiverCustomer.name").cellType(bindingPathCellType);
    activeSheet.getCell(12, 4).bindingPath("receiverCustomer.company.name").cellType(bindingPathCellType);
    activeSheet.getCell(13, 4).bindingPath("receiverCustomer.company.address").cellType(bindingPathCellType);
    activeSheet.getCell(14, 4).bindingPath("receiverCustomer.company.city").cellType(bindingPathCellType);
    activeSheet.getCell(15, 4).bindingPath("receiverCustomer.company.phone").cellType(bindingPathCellType);
    activeSheet.addSpan(17, 1, 1, 2);
    activeSheet.getCell(17, 1).value("JOB").foreColor("#58B6C0").font("bold 12px Arial");
    activeSheet.addSpan(17, 3, 1, 2);
    activeSheet.getCell(17, 3).value("PAYMENT TERMS").foreColor("#58B6C0").font("bold 12px Arial");
    activeSheet.addSpan(18, 1, 1, 2);
    activeSheet.getCell(18, 1).backColor("#DDF0F2");
    activeSheet.addSpan(18, 3, 1, 2);
    activeSheet.getCell(18, 3).value("Due on receipt").backColor("#DDF0F2").foreColor("#58B6C0").font("12px Arial");
    activeSheet.getRange(17, 1, 2, 4, GC.Spread.Sheets.SheetArea.viewport).setBorder(new GC.Spread.Sheets.LineBorder("#58B6C0", GC.Spread.Sheets.LineStyle.thin), {
            top: true,
            bottom: true,
            innerHorizontal: true
        });
    var table = activeSheet.tables.add("tableRecords", 20, 1, 4, 4, GC.Spread.Sheets.Tables.TableThemes.light6);
    table.autoGenerateColumns(false);
    var tableColumn1 = new GC.Spread.Sheets.Tables.TableColumn();
    tableColumn1.name("DESCRIPTION");
    tableColumn1.dataField("description");
    var tableColumn2 = new GC.Spread.Sheets.Tables.TableColumn();
    tableColumn2.name("QUANTITY");
    tableColumn2.dataField("quantity");
    var tableColumn3 = new GC.Spread.Sheets.Tables.TableColumn();
    tableColumn3.name("AMOUNT");
    tableColumn3.dataField("amount");
    table.bindColumns([tableColumn1, tableColumn2, tableColumn3]);
    table.bindingPath("records");
    table.showFooter(true);
    table.setColumnName(3, "TOTAL");
    table.setColumnValue(2, "TOTAL DUE");
    table.setColumnDataFormula(3, "=[@QUANTITY]\*[@AMOUNT]");
    table.setColumnFormula(3, "=SUBTOTAL(109,[TOTAL])");
    activeSheet.getCell(26, 1).formula('="Make all checks payable to "&B4&". THANK YOU FOR YOUR BUSINESS!"').foreColor("gray").font("italic 14px Arial");
    activeSheet.options.allowCellOverflow = true;
    //Adjust row height and column width
    activeSheet.setColumnWidth(0, 5);
    activeSheet.setColumnWidth(1, 300);
    activeSheet.setColumnWidth(2, 115);
    activeSheet.setColumnWidth(3, 125);
    activeSheet.setColumnWidth(4, 155);
    activeSheet.setRowHeight(0, 5);
    activeSheet.setRowHeight(1, 40);
    activeSheet.setRowHeight(2, 10);
    activeSheet.setRowHeight(17, 0);
    activeSheet.setRowHeight(18, 0);
    activeSheet.setRowHeight(19, 0);
    activeSheet.setRowHeight(25, 10);
    activeSheet.options.gridline = {showVerticalGridline: false, showHorizontalGridline: false};
    //Set a data source
    //activeSheet.setDataSource(dataSource1);
    activeSheet.setDataSource(dataSource2);
    spread.resumePaint();
})
테이블 열에 서식 및 셀 유형 바인딩
SpreadJS에서 제공하는 고급 열 바인딩 기능을 사용하면 데이터 필드 및 이름과 함께 서식 및 다양한 셀 유형을 테이블 열에 바인딩할 수도 있습니다. 또한 테이블 열 내에서 수식 함수를 변환할 수도 있습니다.
bind 메서드를 사용하여 여러 레코드가 포함된 필드에 테이블을 바인딩하고, 테이블 열을 해당 레코드의 데이터 필드에 바인딩할 수 있습니다. 테이블 데이터를 채우기 위해 다른 데이터 소스를 설정하면 테이블이 해당 레코드에 자동으로 바인딩됩니다.
다음 코드는 bind 메서드를 사용하여 테이블 열에 데이터를 바인딩하는 방법을 보여줍니다.
// Initializing Spread
var spread = new GC.Spread.Sheets.Workbook(document.getElementById('ss'), { sheetCount: 1 });

// Get the activesheet
var activeSheet = spread.getActiveSheet();

// Data
var data = {
    name: 'Jones', region: 'East',
    sales: [
        { orderDate: '1/6/2013', item: 'Pencil', units: 95, cost: 1.99, isMakeMoney: true },
        { orderDate: '4/1/2013', item: 'Binder', units: 60, cost: 4.99, isMakeMoney: false },
        { orderDate: '6/8/2013', item: 'Pen Set', units: 16, cost: 15.99, isMakeMoney: false }
    ]
};

var convert = function (item) {
    return item['cost'] + '$';
}

// Add table
var table = activeSheet.tables.add('tableSales', 0, 0, 5, 5);
var tableColumn1 = new GC.Spread.Sheets.Tables.TableColumn(1, "orderDate", "Order Date", "d/M/yy");
var tableColumn2 = new GC.Spread.Sheets.Tables.TableColumn(2, "item", "Item");
var tableColumn3 = new GC.Spread.Sheets.Tables.TableColumn(3, "units", "Units");
var tableColumn4 = new GC.Spread.Sheets.Tables.TableColumn(4, "cost", "Cost", null, null, convert);
var tableColumn5 = new GC.Spread.Sheets.Tables.TableColumn(5, "isMakeMoney", "IsMakeMoney", null, new GC.Spread.Sheets.CellTypes.CheckBox());

table.autoGenerateColumns(false);

// Bind table using the bind() method
table.bind([tableColumn1, tableColumn2, tableColumn3, tableColumn4, tableColumn5], 'sales', data);
for (var i = 0; i < 5; i++)
    activeSheet.setColumnWidth(i, 110.0, GC.Spread.Sheets.SheetArea.viewport);
데이터 매니저 테이블에 바인딩
SpreadJS에서는 새 워크시트 테이블 또는 기존 워크시트 테이블을 데이터 매니저 테이블에 데이터 소스로 바인딩하여 동적으로 데이터를 연동하고 테이블에 업데이트된 정보를 표시할 수 있습니다. 워크시트 테이블을 데이터 매니저 테이블에 바인딩하려면 테이블을 추가한 후 table.bind 메서드를 사용합니다.
테이블을 바인딩한 후 데이터 매니저 테이블의 행 및 열 수가 워크시트의 행 및 열 수를 초과하는 경우 setRowCount/setColumnCount 메서드를 사용하여 워크시트의 범위를 확장해야 합니다.
table.bind 메서드에서 바인딩 열과 바인딩 경로를 지정할 필요는 없지만 최소한 빈 배열을 전달해야 합니다. 그러나 table.bind 메서드에서 바인딩 열을 지정하는 경우 TableColumn의 데이터 필드를 데이터 매니저 테이블의 필드와 일치하도록 지정해야 합니다. 수식은 바인딩 필드로 사용할 수 없습니다.
바인딩 열은 autoGenerateColumns 속성의 부울 값에 따라 서로 다른 결과를 표시합니다.
워크시트 테이블을 데이터 매니저 테이블에 바인딩할 때의 주요 사항은 다음과 같습니다.
크기 조정 핸들을 사용하여 워크시트 테이블의 크기를 데이터 매니저 테이블에 맞게 조정할 수 없습니다.
바인딩 정보를 통해 열이 표시되는 방식만 수정할 수 있으며 데이터 매니저 테이블의 실제 열을 추가/제거/업데이트할 수는 없습니다.
데이터 매니저 테이블에 없는 열에는 수식을 사용할 수 있지만 데이터 매니저 테이블에 있는 열에는 수식을 사용할 수 없습니다.
열 머리글에 데이터가 있는지 여부와 관계없이 열 머리글을 편집하는 경우:
수식을 입력하면 열 머리글에 데이터가 이미 있는 경우 해당 열이 수식 열로 전환됩니다. 그렇지 않으면 계산된 데이터를 표시하는 새 열이 생성됩니다. 그러나 해당 열의 개별 셀 수식은 직접 편집할 수 없습니다.
데이터 필드 이름을 입력하면 테이블에서 해당 필드를 찾습니다.
테이블에 필드가 있는 경우 해당 값이 표시됩니다.
테이블에 필드가 없는 경우 열은 비어 있으며 값을 설정할 수 없습니다.
데이터 매니저 테이블에 바인딩하면 테이블 구조의 제약 조건 내에서 데이터를 정렬하고 필터링할 수 있으며, 테이블에서 사용할 수 있는 데이터 열을 대상으로 작업합니다.
특히 계층 관계가 있는 복잡한 데이터 매니저 테이블을 바인딩하는 경우 현재 완전히 지원되지 않습니다. 이로 인해 바인딩 후 일부 테이블 작업이 예상대로 동작하지 않을 수 있습니다.
여러 테이블이 하나의 데이터 소스에 바인딩되면 상호 종속성이 발생할 수 있습니다. 예를 들어 한 테이블에서 행 확장(
expandBoundRows로 제어)과 같은 구조적 변경이 발생하면 다른 바인딩된 테이블에서도 행 확장이 동기화되어 수행될 수 있습니다.
다음 코드는 빈 배열을 전달하여 워크시트 테이블을 데이터 매니저 테이블에 바인딩합니다.
 spread.options.allowDynamicArray = true;
 spread.options.showHorizontalScrollbar = false;
 const dataManager = spread.dataManager();
 const spreadNS = GC.Spread.Sheets;
 // Data Manager Table Binding to Sheet Table
 let sheet1 = spread.getSheet(0);
 sheet1.name("Data Manager Table Binding");
 const productsTable = dataManager.addTable("products", {
     remote: {
         read: {
             url: 'https://northwind.vercel.app/api/products'
         }
     }
 });
 const ordersTable = dataManager.addTable("orders", {
     data: [
         { orderDate: '1/6/2013', item: 'Pencil111', units: 95, cost: 1.99, isDelivered: true },
         { orderDate: '4/1/2013', item: 'Binder', units: 60, cost: 4.99, isDelivered: false },
         { orderDate: '6/8/2013', item: 'Pen Set', units: 16, cost: 15.99, isDelivered: false }
     ]
 });
 Promise.all([productsTable.fetch(), ordersTable.fetch()]).then(() => {
     const table = sheet1.tables.add('tableSales', 0, 0, 5, 5);
     table.bind(
         [], // <--- could specify the binding columns or not, but it should pass an empty array at least
         null, // <--- no need to specify the bind path
         "products" // <--- bind the data manager table by table name
     );

     // Rebind Another Table

     //table.bind(
     //  [],   // <--- could specify the binding columns or not, but it should pass an empty array at least
     // null, // <--- no need to specify the bind path
     //"orders"); // <---  bind the data manager table by table name
     // table.bind([], null, ordersTable); // <--- bind the data manager table

 });
다음 코드는 autoGenerateColumns 속성을 활성화/비활성화했을 때 바인딩 열에 표시되는 서로 다른 결과를 보여 줍니다.
autoGenerateColumns속성을 false로 설정하면 워크시트 테이블의 열은 데이터 매니저 테이블의 열에 따라 생성됩니다.
 // Auto Generate Columns - False
let sheet4 = spread.getSheet(3);
sheet4.name("AutoGenerate Columns-FALSE");
ordersTable.fetch().then(() => {
    // The table could be existing
    const table = sheet4.tables.add('tableSales3', 0, 0, 5, 7); // << ---- the table column count is bigger than the data manager table column count
    // Define the table columns
    const tableColumn1 = new spreadNS.Tables.TableColumn(0, "orderDate", "Order Date", "yyyy-mm-dd");
    const tableColumn2 = new spreadNS.Tables.TableColumn(1, "item", "Item");
    const tableColumn3 = new spreadNS.Tables.TableColumn(2, "units", "Units", '#,##0');
    const tableColumn4 = new spreadNS.Tables.TableColumn(3, "cost", "Cost");
    const tableColumn5 = new spreadNS.Tables.TableColumn(4, "isDelivered", "IsDelivered", null, new GC.Spread.Sheets.CellTypes.CheckBox());
    // It's necessary to disable auto generate columns for binding Table Columns
    table.autoGenerateColumns(false);
    // Bind the table columns and data manager table to sheet Table
    table.bind([tableColumn1, tableColumn2, tableColumn3, tableColumn4], null, "orders");  // <--- bind the data manager table
    // The table will show the columns: Order Date, Item, Units, Cost, IsDelivered, Column6, Column7
    // And it could set the column data formula for the Column6, Column7, if need
    // table.setColumnDataFormula(5, "=[@Cost] * [@Units]"); // Column6
});autoGenerateColumns속성을 true(기본값)로 설정하면 워크시트 테이블에서 데이터 매니저 테이블의 열을 기반으로 열을 자동으로 생성합니다. 이 속성이 활성화된 상태에서는 지정된 열 바인딩이 적용되지 않습니다.
// Auto Generate Columns - True
let sheet3 = spread.getSheet(2);
sheet3.name("AutoGenerate Columns-TRUE");
ordersTable.fetch().then(() => {
    // The table could be exist
    const table = sheet3.tables.add('tableSales2', 0, 0, 5, 5);
    // Define the table columns
    const tableColumn1 = new spreadNS.Tables.TableColumn(0, "orderDate", "Order Date", "yyyy-mm-dd");
    const tableColumn2 = new spreadNS.Tables.TableColumn(1, "item", "Item");
    const tableColumn3 = new spreadNS.Tables.TableColumn(2, "units", "Units", '#,##0');
    const tableColumn4 = new spreadNS.Tables.TableColumn(3, "cost", "Cost");
    const tableColumn5 = new spreadNS.Tables.TableColumn(4, "isDelivered", "IsDelivered", null, new GC.Spread.Sheets.CellTypes.CheckBox());
    // The autoGenerateColumns turns on by default
    // table.autoGenerateColumns(true);
    // Bind the data manager table to sheet Table
    // The columns pre-defined could not work for the autoGenerateColumns be true
    // The code below is similar as table.bind([], null, ordersTable);
    table.bind([tableColumn1, tableColumn2, tableColumn3, tableColumn4, tableColumn5], null, "orders");  // <--- bind the data manager table
});
다음 코드는 bindColumns 메서드를 사용하여 바인딩 열을 업데이트합니다.
 let sheet5 = spread.getSheet(4);
 sheet5.name("Update Binding");
 ordersTable.fetch().then(() => {
     sheet5.suspendPaint();
     var ordersSheetTable = sheet5.tables.add('tableSales4', 0, 0, 1, 3);
     const tableColumn1 = new GC.Spread.Sheets.Tables.TableColumn(1, "item", "item");
     const tableColumn2 = new GC.Spread.Sheets.Tables.TableColumn(2, "cost", "Cost");
     const tableColumn3 = new GC.Spread.Sheets.Tables.TableColumn(3, "units", "Units", '#,##0');
     let bindingColumns = [tableColumn1, tableColumn2, tableColumn3];
     // bind the columns
     ordersSheetTable.autoGenerateColumns(false)
     ordersSheetTable.bind(bindingColumns, null, 'orders');
     sheet5.resumePaint();
     // update the data field or other properties of the column at other times
     sheet5.suspendPaint();
     bindingColumns[1].dataField(null); // << --- unbind the field
     bindingColumns[1].name('Total Cost'); // << --- specify the column name
     // re-bind the columns
     ordersSheetTable.bindColumns(bindingColumns);
     bindingColumns[0].dataField('cost'); // << --- update the data field
     bindingColumns[0].name('Cost'); // << --- update the table name
     bindingColumns[0].formatter('$#,##0');  // << --- update the column value formatter
     // re-bind the columns
     ordersSheetTable.bindColumns(bindingColumns);
     ordersSheetTable.setColumnDataFormula(1, '=[@Units]*[@Cost]'); // << --- set Total Cost with data formula
     sheet5.resumePaint();
 });
데이터 매니저 테이블에 변경 사항 저장
SpreadJS에서는 데이터 매니저 테이블에 바인딩된 워크시트 테이블의 변경 사항을 저장할 수 있습니다. 데이터 매니저 테이블이 배치 모드인 경우 GC.Spread.Sheets.Commands 네임스페이스의 tableSubmitChanges 명령을 사용하여 바인딩된 테이블의 변경 사항을 저장합니다. 실행 취소/다시 실행 작업을 지원하며 시트 이름 및 테이블 이름과 같은 특정 옵션을 사용하여 실행할 수 있습니다.
바인딩된 시트 테이블 가져오기/내보내기
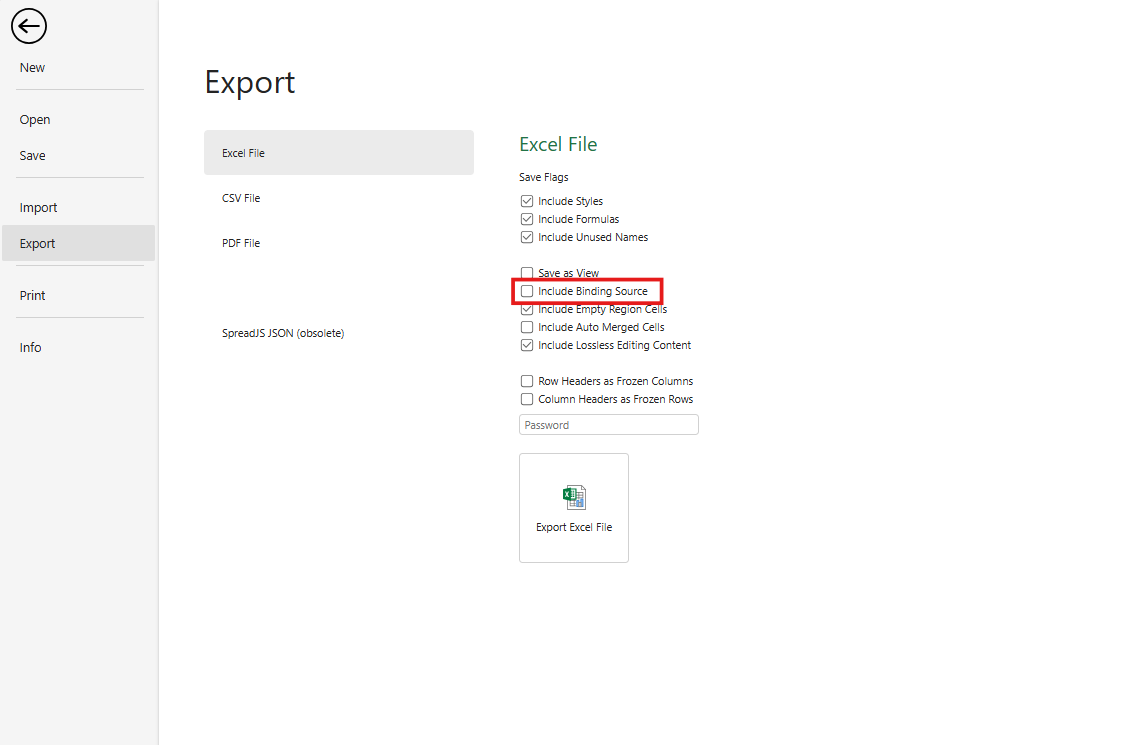
바인딩된 워크시트를 SJS 또는 SSJSON 파일 형식으로 내보내면 변경 사항이 자동으로 저장됩니다. 그러나 Xlsx 형식으로 저장하는 경우 ExportXlsxOptions의 includeBindingSource 옵션을 true로 설정해야 합니다.
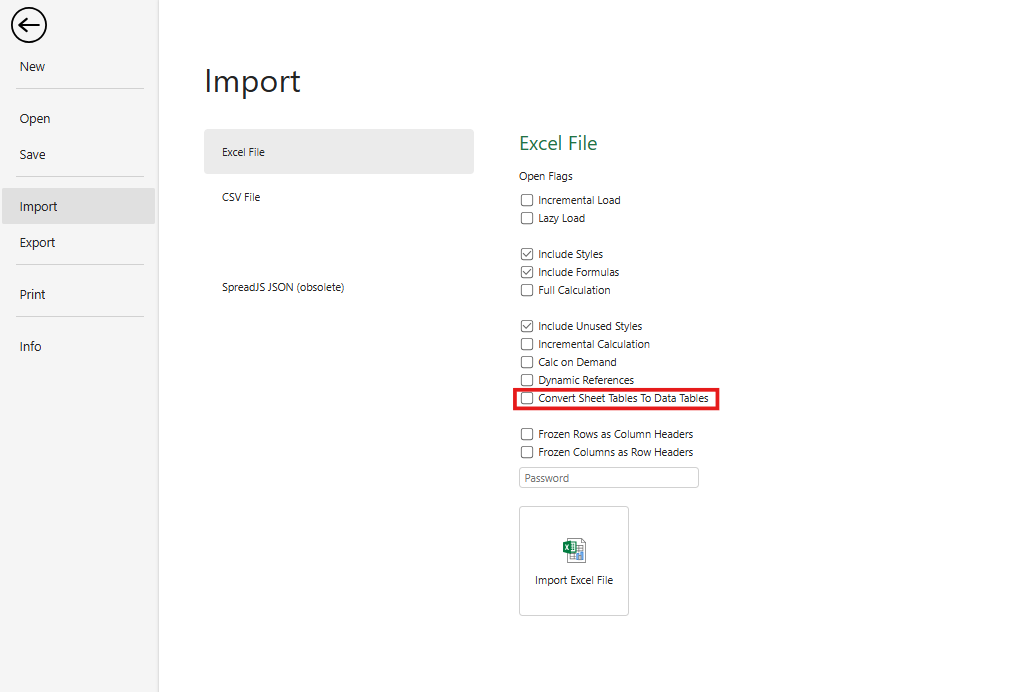
Excel 파일을 가져올 때 ImportXlsxOptions의 convertSheetTableToDataTable 옵션을 true로 지정하여 모든 시트 테이블을 데이터 매니저 테이블로 변환할 수 있습니다. 셀 기반 수식은 가져오는 동안 제거됩니다. 그러나 열 기반 수식은 가져오기 및 내보내기 과정에서 변환됩니다.
디자이너 사용
디자이너를 사용하여 테이블을 데이터 매니저 테이블에 바인딩하려면 다음 단계를 수행합니다.
빈 셀을 선택합니다.
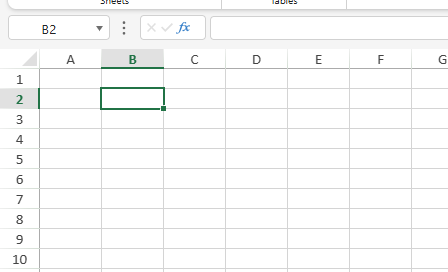
디자이너에서 삽입 탭으로 이동합니다.

테이블 그룹에서 "테이블" 버튼 옆의 드롭다운 버튼을 클릭합니다.

"데이터 테이블에서" 위에 마우스를 올려 사용 가능한 데이터 매니저 테이블 목록을 표시합니다.
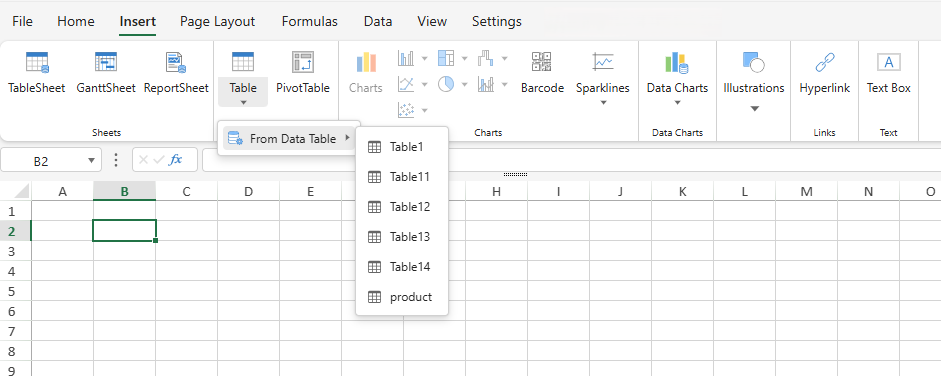
목록에서 데이터 매니저 테이블을 선택합니다.
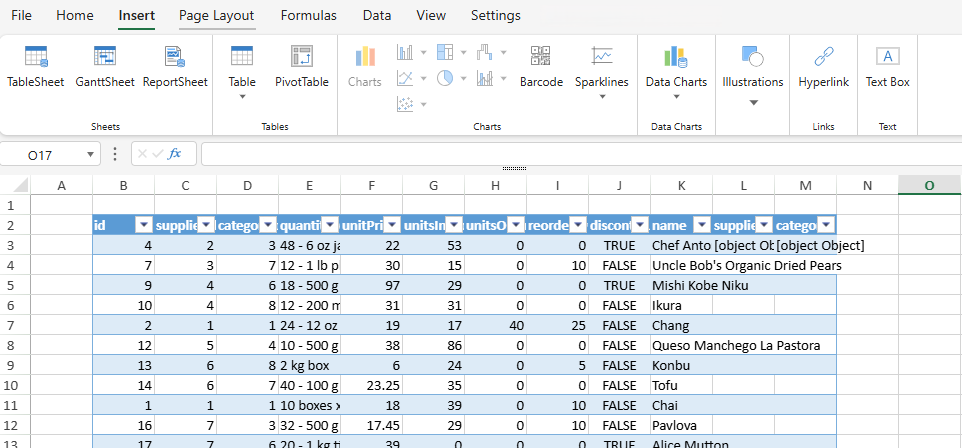
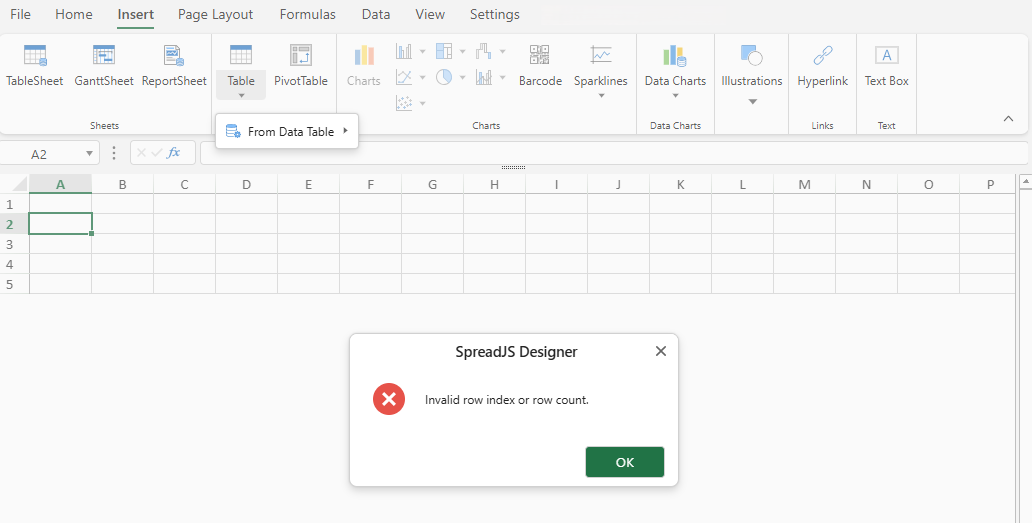
디자이너는 일반 테이블을 삽입할 때와 마찬가지로 선택한 테이블의 행 및 열 수를 기준으로 현재 위치에 테이블을 삽입할 수 있는지 확인합니다.
Xlsx 형식 파일을 가져올 때 시트 테이블을 데이터 테이블로 변환하려면 시트 테이블을 데이터 테이블로 변환 옵션을 활성화합니다.
Excel로 내보낼 때는 바인딩 소스 포함 옵션을 활성화해야 합니다.
바인딩된 테이블 행 확장
SpreadJS에서는 바인딩된 테이블의 행을 확장할 수 있습니다. 이를 위해 Table 유형의 expandBoundRows 메서드를 사용하여 시트를 직접 확장하거나 바인딩된 테이블에서 행을 삽입/삭제할 수 있습니다.
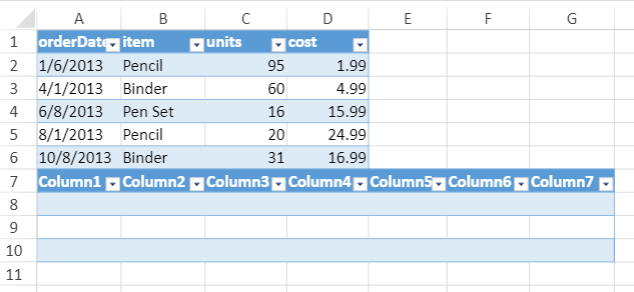
다음 코드는 expandBoundRows 메서드를 사용하여 바인딩된 테이블의 행을 확장하는 방법을 보여 줍니다.
// Initializing Spread
var spread = new GC.Spread.Sheets.Workbook(document.getElementById('ss'), { sheetCount: 3 });
// Get the activesheet
var sheet = spread.getSheet(0);
// Create data
var data = {
    name: 'Jones', region: 'East',
    sales: [
        { orderDate: '1/6/2013', item: 'Pencil', units: 95, cost: 1.99 },
        { orderDate: '4/1/2013', item: 'Binder', units: 60, cost: 4.99 },
        { orderDate: '6/8/2013', item: 'Pen Set', units: 16, cost: 15.99 },
        { orderDate: '8/1/2013', item: 'Pencil', units: 20, cost: 24.99 },
        { orderDate: '10/8/2013', item: 'Binder', units: 31, cost: 16.99 }
    ]
};
// Add table named as "table1"
var table1 = sheet.tables.add('tableRecords', 0, 0, 4, 4);
table1.autoGenerateColumns(true);
// Add another table named as "table2"
var table2 = sheet.tables.add('tableBelow', 4, 0, 4, 7);
// Bind table1
table1.expandBoundRows(true);
table1.bindingPath('sales');
// Set datasource
var dataSource = new GC.Spread.Sheets.Bindings.CellBindingSource(data);
sheet.setDataSource(dataSource);
바인딩 소스 가져오기
테이블의 바인딩 소스를 확인하여 해당 테이블이 데이터 매니저 테이블에 바인딩되어 있는지 확인할 수 있습니다.
API 사용
GC.Spread.Sheets.Tables.Table 개체의 getBindingSource 메서드를 사용하여 테이블이 바인딩된 기본 데이터 소스를 가져올 수 있습니다.
참고:
테이블이 데이터 소스에 바인딩되어 있지 않은 경우
getBindingSource는 null을 반환합니다.
예제 1: 개체 배열에 바인딩
JavaScript 배열을 데이터 소스로 사용하여 테이블을 생성하거나 바인딩한 경우
getBindingSource는 해당 배열을 반환합니다.var source = [ { LastName: "Freehafer", FirstName: "Nancy", Title: "Sales Representative", Phone: "(123)555-0100"}, { LastName: "Cencini", FirstName: "Andrew", Title: "Vice President, Sales", Phone: "(123)555-0101"}, { LastName: "Kotas", FirstName: "Jan", Title: "Sales Representative", Phone: "(123)555-0102"}, { LastName: "Sergienko", FirstName: "Mariya", Title: "Sales Representative", Phone: "(123)555-0103"}, ]; // Assuming 'activeSheet' is the current sheet const table = activeSheet.tables.addFromDataSource("Table1", 5, 2, source, GC.Spread.Sheets.Tables.TableThemes.dark1); // Get the binding source - it will be the 'source' array const bindingSource = table.getBindingSource(); console.log(bindingSource === source); // Should output true예제 2: 데이터 매니저 테이블에 바인딩
데이터 매니저 테이블의 이름을 데이터 소스로 사용하여 테이블을 생성하거나 바인딩한 경우
getBindingSource는 데이터 매니저에서 해당GC.Data.Table개체를 반환합니다.// Assuming 'spread' is the SpreadJS instance const productsTable = spread.dataManager().addTable("products", { remote: { read: { url: 'https://northwind.vercel.app/api/products' } } }); productsTable.fetch().then(()=>{ // Method 1: Add a table and bind to a Data Manager table using addFromDataSource const table1 = spread.getActiveSheet().tables.addFromDataSource("Table1", 0, 0, "products", GC.Spread.Sheets.Tables.TableThemes.medium7); // Get the binding source - it will be the 'productsTable' Data Manager table let bindingTable1 = table1.getBindingSource(); console.log(bindingTable1 === productsTable); // Should output true // Method 2: Add a table and then bind to a Data Manager table using bind const table2 = spread.getActiveSheet().tables.add('Table2', 0, 0, 5, 5); table2.bind( [], // Optional: specify binding columns, or pass empty array undefined, // Optional: bind path "products" // Specify the Data Manager table name ); // Get the binding source - it will also be the 'productsTable' Data Manager table let bindingTable2 = table2.getBindingSource(); console.log(bindingTable2 === productsTable); // Should output true });
디자이너 사용
시트에서 테이블을 선택합니다.
디자이너 리본에서 테이블 디자인 탭으로 이동합니다.
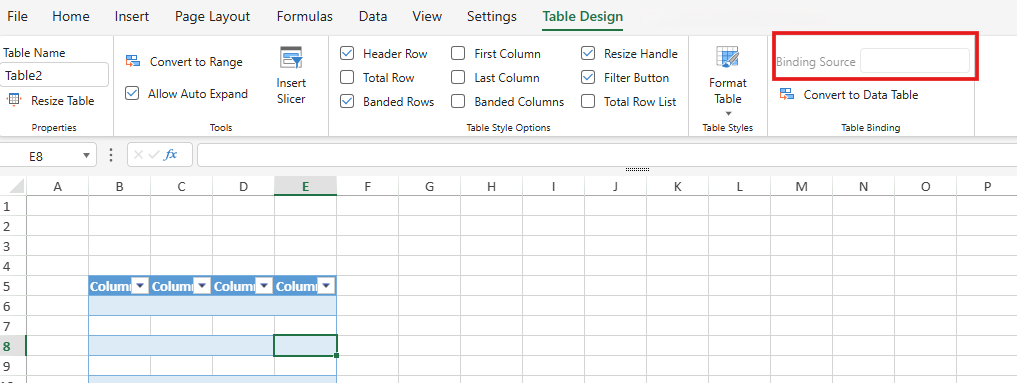
테이블 바인딩 섹션에 "바인딩 소스"라는 텍스트 상자가 있습니다.
선택한 테이블이 데이터 매니저 테이블에 바인딩되어 있는 경우 이 텍스트 상자에 데이터 매니저 테이블의 이름이 표시됩니다.
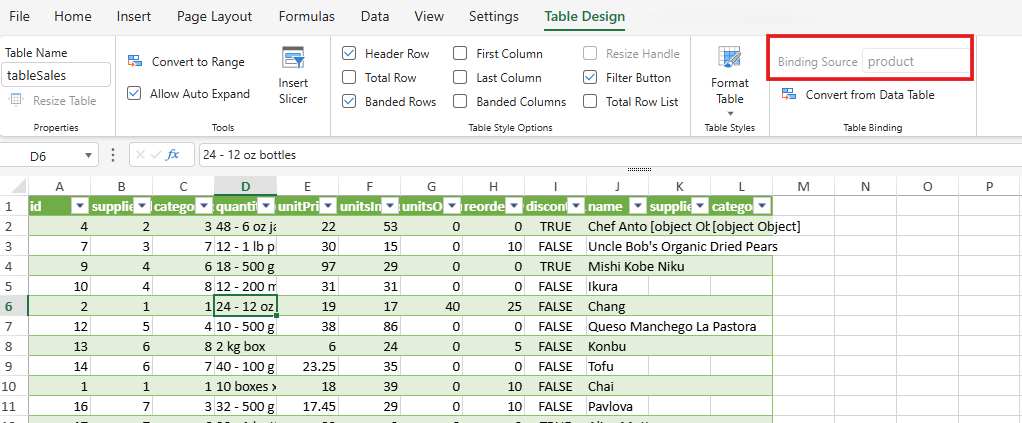
테이블이 데이터 매니저 테이블에 바인딩되어 있지 않은 경우(예: 단순 개체 배열에 바인딩되었거나 전혀 바인딩되지 않은 경우) "바인딩 소스" 텍스트 상자는 비어 있습니다.
데이터 매니저 레코드의 필드에 테이블 바인딩
셀 바인딩 소스를 통해 시트가 데이터 매니저 테이블에 바인딩된 경우 워크시트 테이블에서 bindingPath를 사용하여 현재 레코드의 배열 필드에 바인딩할 수 있습니다.
이 기능은 마스터-세부 정보 레이아웃에 유용합니다. 예를 들어 시트에는 한 사람의 레코드에 있는 필드를 표시하고 워크시트 테이블에는 해당 사람의 프로젝트 레코드를 표시할 수 있습니다.
var persons = [
    {
        name: "Wang feng",
        age: 25,
        address: { postcode: "710075" },
        project: [
            { name: "project1", budget: 10000 },
            { name: "project2", budget: 20000 }
        ]
    },
    {
        name: "Li lei",
        age: 26,
        address: { postcode: "710076" },
        project: [
            { name: "project3", budget: 30000 },
            { name: "project4", budget: 40000 }
        ]
    }
];
var dataManager = spread.dataManager();
var personsTable = dataManager.addTable("Persons", {
    data: persons
});
var source = new GC.Spread.Sheets.Bindings.CellBindingSource(personsTable, 0);
activeSheet.setDataSource(source);
activeSheet.setBindingPath(0, 0, "name");
activeSheet.setBindingPath(1, 0, "age");
activeSheet.setBindingPath(2, 0, "address.postcode");
var table = activeSheet.tables.add("projectTable", 5, 0, 4, 2);
table.bindingPath("project");
이 예제에서 시트는 Persons 데이터 매니저 테이블의 첫 번째 레코드에 바인딩됩니다. 워크시트 테이블은 해당 레코드의 project 배열 필드에 바인딩됩니다.
이 시나리오는 워크시트 테이블을 데이터 매니저 테이블에 직접 바인딩하는 것과 다릅니다. 데이터 매니저 테이블의 모든 레코드를 워크시트 테이블에 표시하려면 데이터 매니저 테이블 직접 바인딩을 사용합니다.