스타일링과 CSS
TreeView의 외관은 CSS를 사용하여 사용자 정의할 수 있습니다. 아래는 다양한 종류의 사용자 정의를 보여주는 두 가지 예제입니다.
예제 1
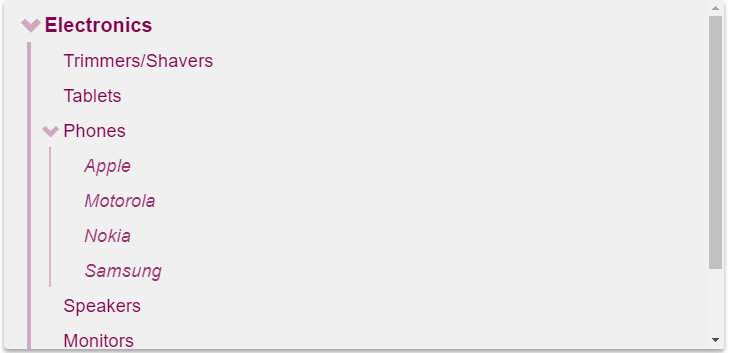
이 예제는 접기/펼치기 아이콘을 변경하고, 노드 수준에 따라 다른 폰트 크기를 사용하며, 레벨 1 노드의 왼쪽에 수직 바를 추가합니다.

CSS
  .custom-tree.wj-treeview {
       color: #80044d;
   }

    /* default nodes */
    .custom-tree.wj-treeview .wj-node {
    }

    /* level 0 and deeper nodes */
    .custom-tree.wj-treeview .wj-nodelist > .wj-node {
        font-size: 120%;
        font-weight: bold;
    }

    /* level 1 and deeper nodes (smaller font, vertical line along the left) */
    .custom-tree.wj-treeview .wj-nodelist > .wj-nodelist > .wj-node,
    .custom-tree.wj-treeview .wj-nodelist > .wj-nodelist > .wj-nodelist {
        font-size: 110%;
        font-weight: normal;
        border-left: 4px solid rgba(128, 4, 77, 0.3);
    }

    /* level 2 and deeper nodes (smaller font, thinner border) */
    .custom-tree.wj-treeview .wj-nodelist > .wj-nodelist  > .wj-nodelist > .wj-node, .custom-tree.wj-treeview .wj-nodelist > .wj-nodelist  > .wj-nodelist > .wj-nodelist {
        font-size: 100%;
        font-style: italic;
        opacity: 0.8;
        border-left: 2px solid rgba(128, 4, 77, 0.3);
    }

    /* expanded node glyph */
    .custom-tree.wj-treeview .wj-nodelist .wj-node:before {
        content: "\e114";
        font-family: 'Glyphicons Halflings';
        top: 4px;
        border: none;
        opacity: .3;
        transition: all .3s cubic-bezier(.4,0,.2,1);
    }

    /* collapsed node glyph */
    .custom-tree.wj-treeview .wj-nodelist .wj-node.wj-state-collapsed:before, .custom-tree.wj-treeview .wj-nodelist .wj-node.wj-state-collapsing:before
	{
        transform: rotate(-180deg);
        transition: all .3s cubic-bezier(.4,0,.2,1);
    }

    /* selected node */
    .custom-tree.wj-treeview .wj-node.wj-state-selected {
        color: white;
        background: rgba(128, 4, 77, 0.70);
    }

    /* default trees on this sample */
     .wj-treeview {
         display:block;
          height: 350px;
          font-size: 120%;
          margin-bottom: 8px;
          padding: 6px;
          background: #f0f0f0;
          box-shadow: 0 3px 6px rgba(0,0,0,0.16), 0 3px 6px rgba(0,0,0,0.23);
    }
    body {
         margin-bottom: 24pt;
    }
HTML
<div id="theTree" class="custom-tree"></div>예제 2
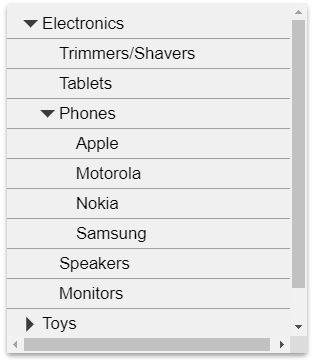
트리 노드에 하단 테두리를 추가합니다. 테두리가 트리의 왼쪽 끝까지 확장되도록 하기 위해, CSS는 padding-left 와 margin-left 속성뿐만 아니라 테두리도 설정합니다.

CSS
.custom-tree.wj-treeview .wj-node {
  border-bottom: 1px solid #a0a0a0;
  padding-left: 110px;
  margin-left: -100px;
  margin-right: -10px;
}

.wj-treeview {
  width: 300px;
  height: 350px;
  font-size: 120%;
  margin-top: 8px;
  margin-bottom: 8px;
  padding: 6px;
  background: #f0f0f0;
  box-shadow: 0 3px 6px rgba(0,0,0,0.16), 0 3px 6px rgba(0,0,0,0.23);
}
body {
  margin-bottom: 24pt;
}
HTML
<div id="theTree" class="custom-tree"></div>

