Save Spreadsheet Changes
The following section describes the steps to store changes made in a spreadsheet and to remove all the changes by refreshing the spreadsheet.
Step 1: Modify Spreadsheet and Protect it
Modify the refresh function created in Data Binding section. After invoking loadTable function, execute the suspendDirty and resumeDirty methods so that the changes made to column F are not stored.
Set the value, background color, and horizontal al.ignment for cell F1 of the spreadsheet.
Set isProtected option to true to protect the spreadsheet.
Set locked method to false to prevent locking of cells in the spreadsheet.
//1: Set the value, backcolor, and halign between suspending / resume dirty & Protect the sheet and lock F column
function refresh() {
    var ss = GC.Spread.Sheets.findControl(document.getElementById("ss"));
    // Get activesheet
    var sheet = ss.getActiveSheet();
    // Reset the sheet and set the column count
    sheet.reset();
    sheet.setColumnCount(7);
    // Load the table to the Spread instance using the sample data
    var data = createSampleData();
    loadTable(ss, data);
    // Set the value, backcolor, and halign between suspending / resume dirty
    // Suspend dirty cells
    sheet.suspendDirty();
    // Set the value, background color and halign for cell F1
    sheet
        .getCell(0, 5)
        .backColor("yellow")
        .value("Changes")
        .hAlign(GC.Spread.Sheets.HorizontalAlign.center);
    // Resume dirty cells
    sheet.resumeDirty();

    // Protect the sheet and lock F column
    sheet.options.isProtected = true;
    // 4.1) Setting the sheets default stye to not lock the cells
    var s = sheet.getDefaultStyle();
    s.locked = false;
    sheet.setDefaultStyle(s);
    // 4.1) Specifying to lock column F to display the new and old value (column index 5)
    sheet.getRange(-1, 5, -1, 1).locked(true);
Create an HTML input button ' Refresh' that will execute the refresh function.
<!--Create a refresh button-->
<input type="button" value="Refresh" onclick="refresh()" />
Step 2: Get Dirty Cell Information
Create showChanges function and use getDirtyCells and hasPendingChanges methods to get information on dirty cells along with the pending changes.
Create a data array, dirtyDataArray, to store the dirty cell information about row, col, rowCount, and colCount.
Use setValue method to set the value of cell in column F such that it displays the old and the new values of dirty cells in it.
// Step 2: Create showChanges()
function showChanges(ss, row, col, rowCount, colCount) {
    // Get activesheet
    var sheet = ss.getActiveSheet();
    // If the activesheet has pending changes
    if (sheet.hasPendingChanges()) {
        // Suspend Paint, Event, Dirty
        ss.suspendPaint();
        ss.suspendEvent();
        sheet.suspendDirty();
        // Store dirty cell collection in data array called dirtyDataArray
        var dirtyDataArray = sheet.getDirtyCells(row, col, rowCount, colCount);

        // Skip dirty changes for column 'F'
        for (var i = 0; i < dirtyDataArray.length; i++) {
            // Store dirty cell data in the dirty data array
            var dirtyCell = dirtyDataArray[i];

            // Display the old and new value from the dirtyDataArray values
            // row index --> dirtyCell.row returns the row index of the row that had the changes made
            // column index --> 5 is for the row index for column F
            sheet.setValue(
                dirtyCell.row,
                5,
                "old: " + dirtyCell.oldValue + ", new: " + dirtyCell.newValue
            );
        }
        // Resume dirty, event, paint
        sheet.resumeDirty();
        ss.resumeEvent();
        ss.resumePaint();
    }
}
Step 3: Display Dirty Cell Values
Bind CellChanged and RangeChanged events to the active sheet to execute the showChange function each time the spreadsheet is modified.
// Step 3: Bind CellChanged and RangeChanged events to the sheet
$(document).ready(function () {
    // initializing Spread
    var spread = new GC.Spread.Sheets.Workbook(document.getElementById("ss"));
    // Invoke the refresh function
    refresh();
    // Bind CellChanged
    spread.bind(GC.Spread.Sheets.Events.CellChanged, function (event, data) {
        var row = data.row,
            col = data.col;
        if (
            data.propertyName !== "value" ||
            row === undefined ||
            col === undefined
        ) {
            return;
        }
        // Execute the showChanged function
        showChanges(spread, row, col);
    });
    // Bind RangeChanged
    spread.bind(GC.Spread.Sheets.Events.RangeChanged, function (event, data) {
        var row = data.row,
            col = data.col,
            rowCount = data.rowCount,
            colCount = data.colCount;
        if (
            row === undefined ||
            col === undefined ||
            rowCount === undefined ||
            colCount === undefined
        ) {
            return;
        }
        // Execute the showChanged function
        showChanges(spread, row, col, rowCount, colCount);
    });
});
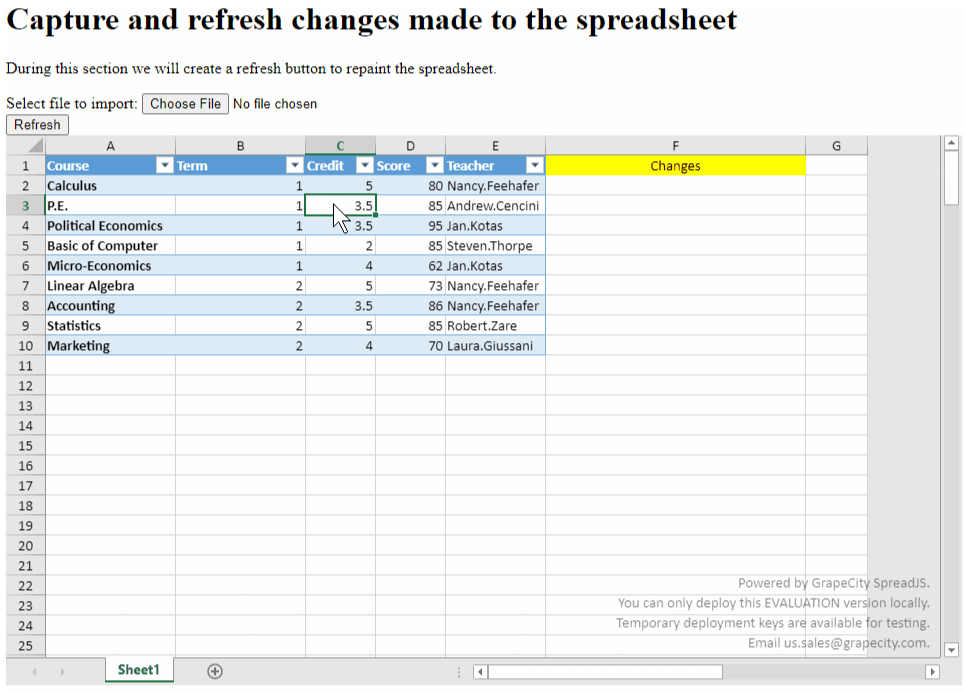
The old and new values will appear in column F. Also, column F is locked so that its content cannot be modified. You can also refresh the spread instance using Refresh button, to remove all changes. The output of above code will look like below:

The following section describes the steps to save spreadsheet changes to the database.
Note: SpreadJS does not update the database directly, but you can get the changed data by the following method and update the database accordingly.
Step 1: Get Dirty Cell Information and Convert it to JSON String
Create saveToDB function and use getDirtyCells method to get information about changed cells, known as dirty cells.
Use JSON.stringify method to convert dirty cell information to JSON string.
//1: Create saveToDB()
function saveToDB() {
    // Get the activesheet from the DOM element "ss"
    var ss = GC.Spread.Sheets.findControl(document.getElementById("ss"));
    var sheet = ss.getActiveSheet();
    // Store the dirty cells information in the dirtyCells variable
    var dirtyCells = sheet.getDirtyCells();
    // Get the HTML <div> element "msg" by id, this will be created in Step 2
    var div = document.getElementById("msg");
    // Display the JSON string in the div element to visualize the changed cell information
    div.innerHTML = JSON.stringify(dirtyCells, null, 4);
    // Note: Post changes to your database
}
Step 2: Save Changes to Database
Create an HTML
<div>element with msg ID after SpreadJS<div>element to display JSON string.Create an input button Save to DB where the saveToDB function is invoked. The changes captured and converted to JSON string will be displayed in the msg ID
<div>when clicking the Save to DB button.The new HTML
<body>with all buttons and<div>elements will look like below:<body> <h1>Save changes made to the spreadsheet to a database</h1> <p> During this section we will create a Save to DB button and a DIV to display the changes as a JSON string when the Save to DB button is clicked. </p> <!-- Create a refresh button --> <input type="button" value="Refresh" onclick="refresh()" /> <!-- Create Save to DB <div> and button --> <input type="button" value="Save to DB" onclick="saveToDB()" /> <br /> <br /> <div id="ss" style="height:400px;width:900px"></div> <!-- Changes <div> --> <div class="options-container"> <h4> Changes saved to database: </h4> <div id="msg" style="width: 100%; height: 260px; border: 1px solid grey;"></div> </div> </body>
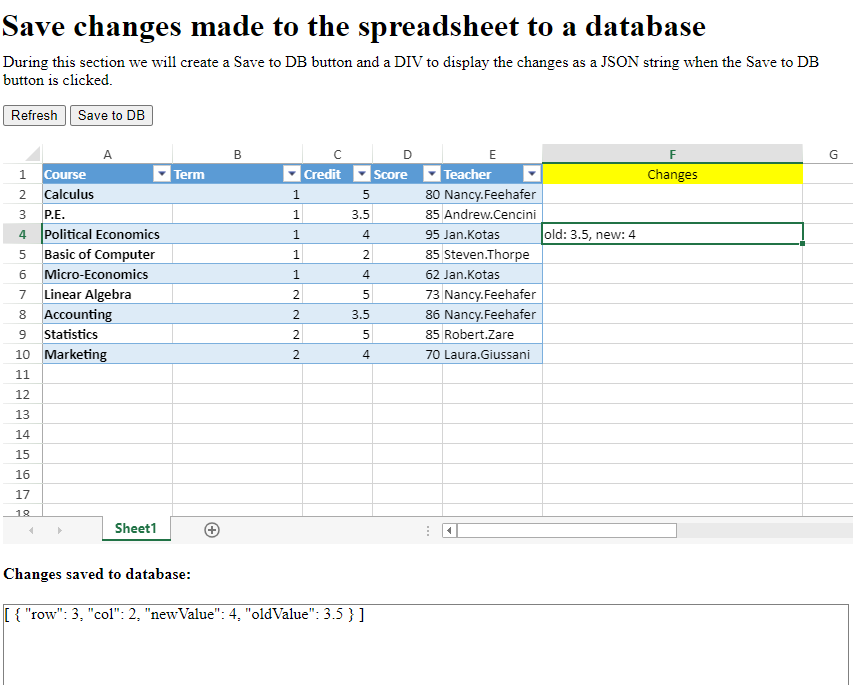
The JSON string which contains the changes and will be posted to the database is displayed in the output as shown below:


