- SpreadJS Overview
- Getting Started
- JavaScript Frameworks
- Best Practices
-
Features
- Workbook
- Worksheet
- Rows and Columns
- Headers
- Cells
- Data Binding
- TableSheet
- GanttSheet
- JSON Schema with SpreadJS
- SpreadJS File Format
- Data Validation
- Conditional Formatting
- Sort
- Group
- Formulas
- Serialization
- Keyboard Actions
- Shapes
- Form Controls
- Floating Objects
- Barcodes
- Charts
- Sparklines
- Tables
- Pivot Table
- Slicer
- Theme
- Culture
- SpreadJS Designer
- SpreadJS Designer Component
- Touch Support
- Formula Reference
- Import and Export Reference
- Frequently Used Events
- API Documentation
- Release Notes
Protect Worksheet and Lock Cells
SpreadJS allows you to protect a worksheet that locks all cells and prevents other users from changing, moving, or deleting the data. However, you can still copy the data from locked cells.
The isProtected option can be set to true to protect a worksheet and the locked method can be used to lock or unlock the cells.
Unlock Cells in a Protected Worksheet
You can allow the user to edit specific cells in a protected worksheet by setting the locked method as False.
sheet.getCell(1,1, GC.Spread.Sheets.SheetArea.viewport).locked(false);
sheet.setValue(1,1,"unLocked");
sheet.getRange(-1,3, -1, 1).locked(false);
sheet.getRange(5, -1, 1, -1).locked(false);
sheet.options.isProtected = true;
Lock a Range of Cells in a Protected Worksheet
You can choose to lock a specific range of cells in a protected worksheet by following the steps below:
Unlock all the cells by creating a custom style and setting the locked method as False.
Separately lock the cell range you want to be read-only.
// Configure Workbook and Worksheet
var spread = new GC.Spread.Sheets.Workbook("ss");
var sheet = spread.getActiveSheet();
// Unlock all the cells in the worksheet via the styles
let style = new GC.Spread.Sheets.Style();
style.locked = false;
// Set style as default style for all the cells in the sheet
sheet.setDefaultStyle(style);
// Separately lock the cell range you want to be read-only
new GC.Spread.Sheets.CellRange(sheet, 0, 0, 13, 4).locked(true);
// Set sheet to be protected
sheet.options.isProtected = true;
The options.protectionOptions property can be used to specify the areas which can be changed. These areas can include resizing, dragging, inserting, or deleting rows or columns, and so on.
When the isProtected option is set to True, the following properties will take effect:
Property | Description |
|---|---|
| Allows you to perform the drag operation while inserting rows. |
| Allows you to perform the drag operation while inserting columns. |
| Allows you to insert rows. |
| Allows you to insert columns. |
| Allows you to delete rows. |
| Allows you to delete columns. |
| Allows you to select locked cells. |
| Allows you to select unlocked cells. |
| Allows you to sort ranges. |
| Allows you to filter ranges. |
| Allows you to edit floating objects. |
| Allows you to resize rows. |
| Allows you to resize columns. |
| Allows you to expand or collapse the row groups. |
| Allows you to expand or collapse the column groups. |
When the isProtected option is set to false, the above protection options will not take any effect.
Enable Protection Options in a Locked Worksheet
You can protect the worksheet and enable various protection options that are available in SpreadJS.
var spread = new GC.Spread.Sheets.Workbook(document.getElementById("ss"));
var sheet = spread.getActiveSheet();
sheet.options.isProtected = true;
sheet.options.protectionOptions.allowDeleteRows = true;
sheet.options.protectionOptions.allowDeleteColumns = true;
sheet.options.protectionOptions.allowInsertRows = true;
sheet.options.protectionOptions.allowInsertColumns = true;
sheet.options.protectionOptions.allowDragInsertRows = true;
sheet.options.protectionOptions.allowDragInsertColumns = true;
sheet.options.protectionOptions.allowOutlineColumns = true;
Note: The protection options: allowInsertRows, allowInsertColumns, allowDeleteRows, and allowDeleteColumns are available only when you are performing an operation on the user interface. In other words, the value will only restrict the insertion and deletion of rows and columns commands in the context menu.
Set Alert Message for Protected Groups
By default, you cannot expand or collapse the outline row or column groups in a protected worksheet. An invalidOperation event is triggered which you can also bind to display an alert message as shown below:
// Set alert message
spread.bind(GC.Spread.Sheets.Events.InvalidOperation, (e, args) => {
    if(args.invalidType === GC.Spread.Sheets.InvalidOperationType.groupProtected){
    args.message="Expand or Collapse operation is not allowed for a protected worksheet.";
    alert(args.message)
    }
});
Protect Sheet with Password
You can choose to set the password while protecting the worksheet using the protect method. However, on invoking the protect method, the isProtected option will be set to true automatically.
//Protect the worksheet
var password = 'AddedPassword';
activeSheet.protect(password);
You can further unprotect the worksheet by providing the password as a parameter to the unprotect method.
//unprotect the worksheet with a password
if(activeSheet.hasPassword()) {
    activeSheet.unprotect(password);
} else {
    activeSheet.unprotect();
}
Using Designer
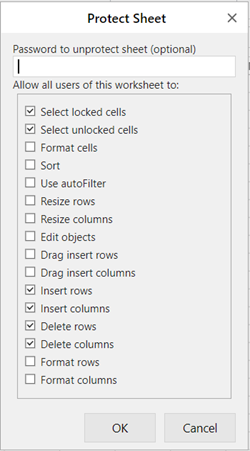
To access the Protect Sheet dialog, navigate to the Protect Sheet option by right-clicking on the sheet name displayed on the Tab strip.
Steps to protect and unprotect the worksheet using Protect Sheet Dialog
Enter the password to protect the worksheet and check/ uncheck multiple options from the available list of options in the Protect Sheet dialog box.

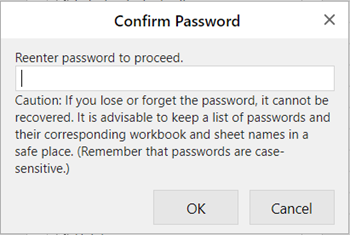
When you enter the password to protect the worksheet, another dialog confirms the password.

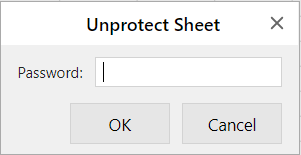
Once a password is successfully set, you can access the protected worksheet, but cannot make any changes to the sheet. To unprotect the worksheet, enter the set password using the Unprotect Sheet dialog.


