- SpreadJS Overview
- Getting Started
- JavaScript Frameworks
- Best Practices
-
Features
- Workbook
- Worksheet
- Rows and Columns
- Headers
- Cells
- Data Binding
- TableSheet
- GanttSheet
- JSON Schema with SpreadJS
- SpreadJS File Format
- Data Validation
- Conditional Formatting
- Sort
- Group
- Formulas
- Serialization
- Keyboard Actions
- Shapes
- Form Controls
- Floating Objects
- Barcodes
- Charts
- Sparklines
- Tables
- Pivot Table
- Slicer
- Theme
- Culture
- SpreadJS Designer
- SpreadJS Designer Component
- Touch Support
- Formula Reference
- Import and Export Reference
- Frequently Used Events
- API Documentation
- Release Notes
TableSheet Relationships
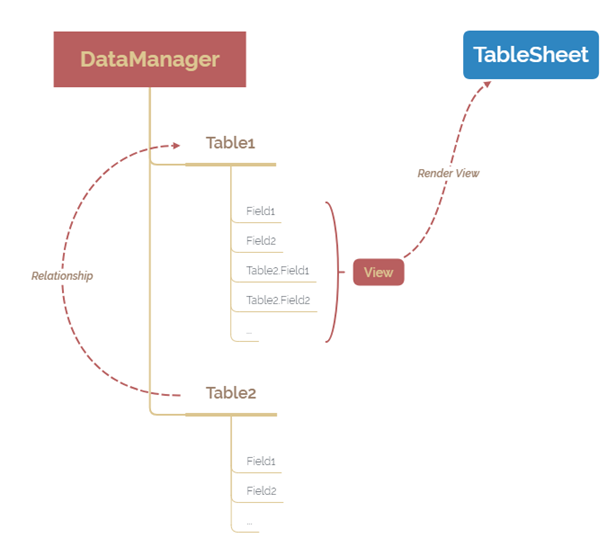
TableSheet provides the ability to bind multiple data tables in the same view by creating relationships.

As shown in the flowchart image above, tablesheet relationships define the related table and the related field and they can be widely used in table structures with primary and foreign key relationships. Both the data tables in the relationship act in a two-way binding in the Data Manager and all the properties from both the tables are accessible.

The following steps show how to add a tablesheet relationship between tables "Sales" and "Customers".
Add multiple tables to the data manager using the addTable method. Use the lookup column to represent and modify the column value.
//add customer table to dataManager
var customerTable = dataManager.addTable("customerTable", {
    remote: {
        read: {
            url: 'https://demodata.grapecity.com/wwi/api/v1/customers'

        }
    }
});

// add sales table to dataManager
    var salesTable = dataManager.addTable("salesTable", {
                remote: {
                    read: {
                        url: 'https://demodata.grapecity.com/wwi/api/v1/sales?PageNumber=10&PageSize=500'
                    }
                },
                schema: {
                    columns: {
                        customerKey: {
                            //                lookup: "myCustomer"
                            lookup: {
                                name: "myCustomer", columns: [
                                    { value: "customerKey", width: 100, caption: "Customer Key" },
                                    { value: "customer", width: "*", caption: "Customer" },
                                    { value: "category", width: 100, caption: "Category" }
                                ]
                            }
                        }
                    }
                }
Add a relationship between tables using the addRelationship method.
It accepts the source - table, field name, relationship name, and the target - table, field name, and relationship name.
In the following code sample, the "customerTable" is the target table and the "customerKey" is the foreign key binding both the tables.
//add relationship between sales table and customer table
dataManager.addRelationship(salesTable, "customerKey", "myCustomer", customerTable, "customerKey", "mySales");
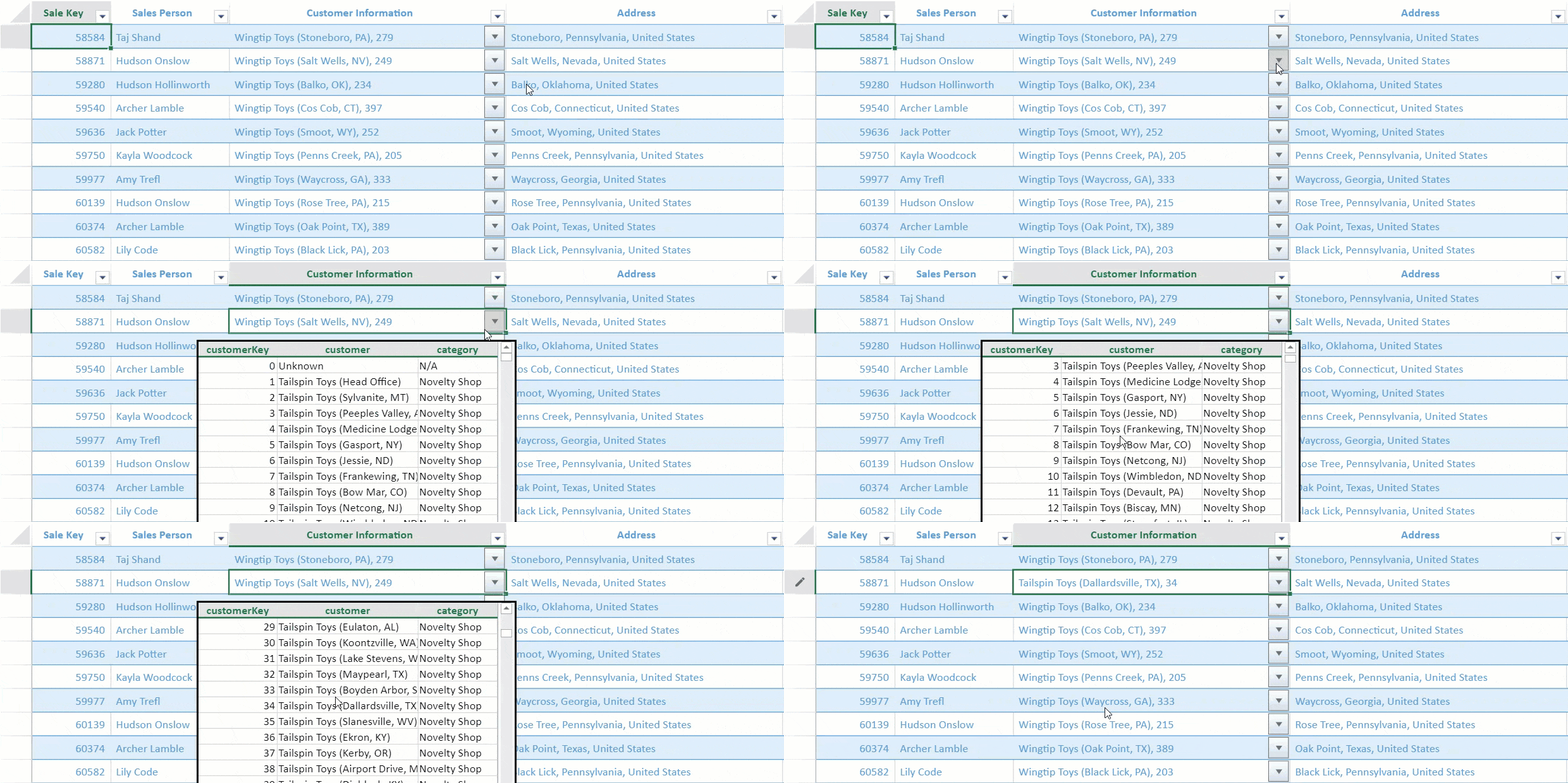
Create a multi-column drop-down view to be used in the relational View.
//add custom view
customerTable.fetch().then(function () {
    var selectView = customerTable.addView("customersView",
        [
{ value: 'customerKey' },
{ value: 'customer' },
{ value: 'category' }
        ]);

    // create a multi column drop down to be used in relational View
    var multiSelectStyle = {
        formatter: '{{=IFERROR(CONCAT([@myCustomer.customer], ", ", [@myCustomer.customerKey]), "")}}',
    };
Bind the view to the tablesheet.
var myView = salesTable.addView("myView", [
    { value: "saleKey", width: 100, caption: "Sale Key" },
    { value: "salesPerson", width: 150, caption: "Sales Person" },
    { value: "customerKey", width: 350, caption: "Customer Information", style: multiSelectStyle },
    { value: "address", width: 350, caption: "Address" },
    { value: "stockItem", width: 350, caption: "Stock Item" },
    { value: "quantity", width: 100, caption: "Quantity" }
]);
myView.fetch().then(function () {
    console.log(myView);
    // Set custom view into tableSheet.
    tableSheet.setDataView(myView);
});


