- SpreadJS Overview
- Getting Started
- JavaScript Frameworks
- Best Practices
-
Features
- Workbook
- Worksheet
- Rows and Columns
- Headers
- Cells
- Data Binding
- TableSheet
- GanttSheet
- JSON Schema with SpreadJS
- SpreadJS File Format
- Data Validation
- Conditional Formatting
- Sort
- Group
- Formulas
- Serialization
- Keyboard Actions
- Shapes
- Form Controls
- Floating Objects
- Barcodes
- Charts
- Sparklines
- Tables
- Pivot Table
- Slicer
- Theme
- Culture
- SpreadJS Designer
- SpreadJS Designer Component
- Touch Support
- Formula Reference
- Import and Export Reference
- Frequently Used Events
- API Documentation
- Release Notes
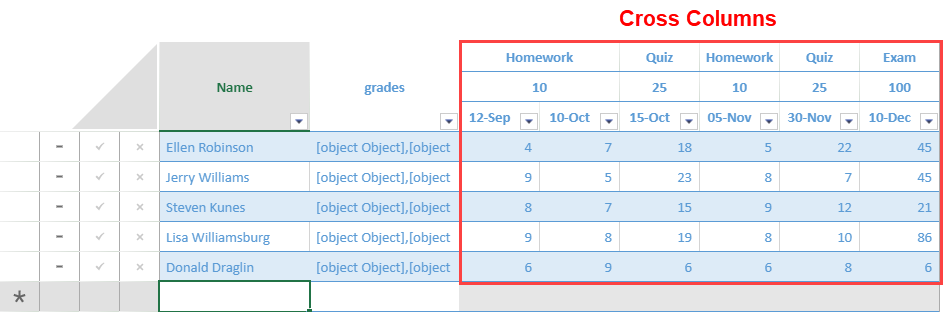
TableSheet Cross Column
TableSheet provides the ability to create a cross column that helps to present fields from multiple related tables in a single row view. You can display the tablesheet in a more streamlined row view for data entry.
The cross column can be set using the cross property of each field while adding fields in the addView method. The “cross” property can be used to set options such as fields, attributes, filters, and captions.
The following steps show how to add a cross column using the array values from the “package” field in a tablesheet.
Add multiple tables with the columns option in the data source schema.
Only the fields that are defined as a lookup in the schema can be used in cross-columns.
//add customer table to dataManager
var customerTable = dataManager.addTable("customerTable", {
    remote: {
        read: {
            url: 'https://demodata.grapecity.com/wwi/api/v1/customers'

        }
    }
});

// add sales table to dataManager
var salesTable = dataManager.addTable("salesTable", {
    remote: {
        read: {
            url: 'https://demodata.grapecity.com/wwi/api/v1/sales?PageNumber=10&PageSize=500'
        }
    },
    schema:{
        columns:{
            package: { lookup: ["Each","Pair"] }, // used for cross column feature
        }
    }
});
Specify the primary key of the tables.
customerTable.primaryKey("customerKey")
salesTable.primaryKey("saleKey")
Add a relationship between tables.
//add relationship between sales table and customer table
dataManager.addRelationship(salesTable, "customerKey", "myCustomer", customerTable, "customerKey", "mySales");
Add a custom view with the cross-column options.
//add custom view
customerTable.fetch().then(function () {
    var selectView = customerTable.addView("customersView",
        [
            { value: 'customerKey' },
            { value: 'customer' },
            { value: 'billToCustomer' },
            { value: 'category' },
        ]);
    // create a multi column drop down to be used in relational View
    var multiSelectStyle = {
        formatter: '{{=IFERROR(CONCAT(PROPERTY(@, "customer"), ", ", PROPERTY(@, "customerKey")), "")}}',
        cellButtons: [
            {
                imageType: "dropdown",
                command: "openMultiColumn",
                useButtonStyle: true,
            }
        ],
        dropDowns: [
            {
                type: "multiColumn",
                option: {
                    width: 400,
                    height: 300,
                    dataSource: selectView,
                    bindingInfos: [
                        { name: "customerKey", size: 100, caption: "Customer Key" },
                        { name: "customer", size: "*", caption: "Customer" },
                        { name: "category", size: 100, caption: "Category" }
                    ]
                }
            }
        ]
    };
    var myView = salesTable.addView("myView", [
        { value: "saleKey", width: 100, caption: "Sale Key" },
        { value: "salesPerson", width: 150, caption: "Sales Person" },
        { value: "myCustomer", width: 250, caption: "Customer Information", style: multiSelectStyle },
        { value: "address", width: 300, caption: "Address" },
        { value: "stockItem", width: 350, caption: "Stock Item" },
        { value: 'quantity', width: 80,cross: { over: 'package' } } // cross column
    ]);
    myView.fetch().then(function () {
        console.log(myView);
        // Set custom view into tableSheet.
        tableSheet.setDataView(myView);
    });
});
The below output will be generated:

Using TableSheet Panel
You can set a cross-column in the tablesheet through the side panel. The lookup property should be set in the columns option when defining the data source schema.
As shown in the image below, click on the lookup field to show the cross area and drag the required field to the Value area to create a cross column.

The below output will be generated: