- SpreadJS Overview
- Getting Started
- JavaScript Frameworks
- Best Practices
- Features
- SpreadJS Designer
-
SpreadJS Designer Component
- Getting Started
- Quick Start
- JavaScript Frameworks
-
Customizations
- Add a Tab
- Add Button in a Tab
- Create and Customize Page Layout Themes
- Add Context Menu Item
- Add New Dialog
- Set Default Active Ribbon Tab
- Enable or Disable Ribbon Elements
- Bind File Import Events
- Customize Status Bar
- Add a Custom Component
- Customize Designer Localization
- Customize File Menu
- Customize Format Culture Dialog
- Toolbar Ribbon
- API Documentation
- Touch Support
- Formula Reference
- Import and Export Reference
- Frequently Used Events
- API Documentation
- Release Notes
Add Button in a Tab
SpreadJS Designer Component allows you to add a button or checkbox in the Ribbon as explained below:
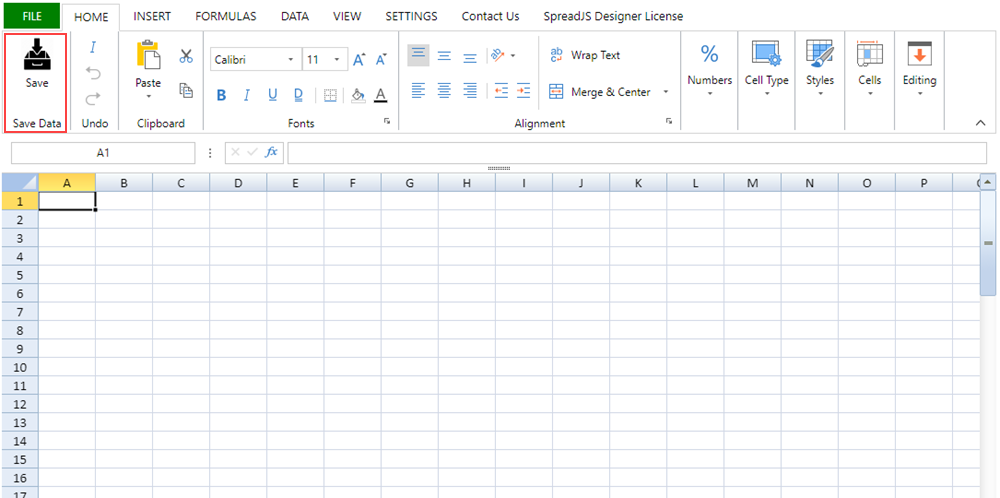
Add 'Save Data' Button
Follow the below steps to add a 'Save Data' button in the 'Home' tab of the ribbon component.
Access the default configuration.
// Configure Workbook and Worksheet
var spread = new GC.Spread.Sheets.Workbook("ss");
var activeSheet = spread.getActiveSheet();

// Access the default config
var config = GC.Spread.Sheets.Designer.DefaultConfig;
Create the "Save Data" button layout structure and add it to the "buttonGroups" field of the "HOME" ribbon.
// Layout of the new button
var saveData = {
    "label": "Save Data",
    "thumbnailClass": "",
    "commandGroup": {
        "children": [
            {
                "direction": "vertical",
                "commands": [
                    "cmdSaveData"
                ]
            }
        ]
    }
}

// Add new button to config ribbon tab
config.ribbon[0].buttonGroups.unshift(saveData);
Set the above command to commandMap in your project.
// Create command for the new button
config.commandMap = {
    cmdSaveData: {
    title: "Save data to server",
    text: "Save",
    iconClass: "cmdSaveData",
    bigButton: "true",
    commandName: "cmdSaveData",
    execute: async (context, propertyName, fontItalicChecked) => {
    // customize operator
    alert('Save data successfully.');
        }
    }
}
Add CSS style setting for "cmdSaveData" button.
<!-- CSS style setting for new button -->
<style>.cmdSaveData {
    background-image: url('./saveData.png');
    background-size: 35px 35px;
}
</style>
Initialize the designer instance by passing
configparameter for customizable configuration.// Initialize the designer instance var designer = new GC.Spread.Sheets.Designer.Designer(document.getElementById("designerHost"), config, spread);
The below output will be generated:
Note: You can also override the default behavior of a button/command by defining its desired
commandMapin the project.
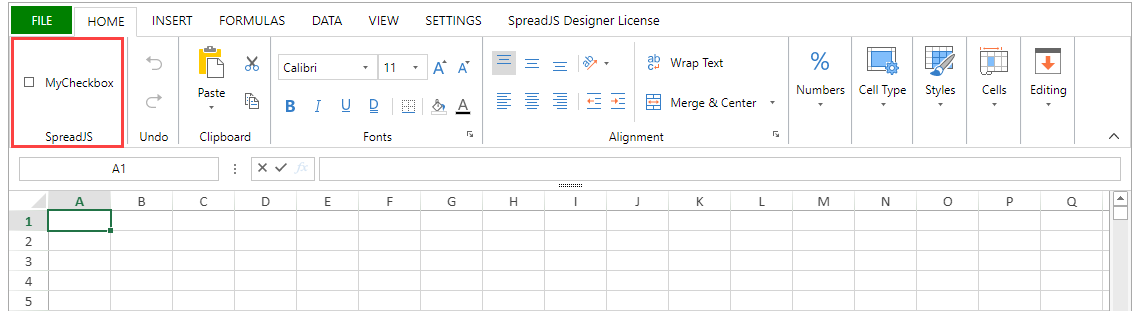
Add Checkbox in Ribbon
You can add a checkbox to the ribbon element and manage its checked or unchecked state. Follow step 1 listed above by adding a label name for the checkbox and creating a MyCheckbox command. Further, set the MyCheckbox command to commandMap in your project as shown below:
config.commandMap = {
    MyCheckbox: {
        title: "Custom Checkbox",
        text: "MyCheckbox",
        type: 'checkbox',
        commandName: "MyCheckbox",
        execute: async (context, propertyName) => {
        let state = context.getData("myCheckState");
        context.setData("myCheckState", !state);
        },
        getState: (context) => {
            return context.getData("myCheckState");
        }
    }
}
Next, follow step 4 as listed above to generate the below output: